Category: Instructions (page 1 of 2)

graco crib 4 in 1 instructions

Graco 4-in-1 Crib Instructions: A Comprehensive Guide

Graco offers versatile 4-in-1 cribs‚ evolving from infant to full-size beds; assembly typically takes under an hour‚ aided by clear manuals and included hardware․

These cribs‚ like the Solano and Read-With-Me models‚ convert seamlessly through toddler‚ daybed‚ and full-size phases‚ providing lasting value and adaptability․

However‚ historical Graco and Simplicity recalls highlight crucial safety checks‚ particularly regarding hardware tightness and potential entrapment hazards for infants․

Understanding the Graco 4-in-1 Crib Features

Graco 4-in-1 convertible cribs are designed with adaptability in mind‚ offering a long-term sleep solution for your child․ These cribs seamlessly transition through four distinct stages: a traditional crib for infants‚ a toddler bed for growing children‚ a daybed for expanded comfort‚ and finally‚ a full-size bed to accommodate older kids․

Key features often include adjustable mattress heights‚ allowing you to lower the mattress as your baby begins to sit and stand‚ ensuring their safety․ Many models‚ such as the Solano‚ incorporate convenient features like attached changing tables with drawers for streamlined nursery organization․ The Read-With-Me model even includes a built-in bookshelf!

The conversion process is generally straightforward‚ utilizing the existing crib frame and requiring minimal additional parts – though a full-size bed conversion kit is necessary for the final stage․ Understanding these features upfront will simplify assembly and maximize the crib’s lifespan‚ providing years of use and value․

Identifying All Parts Included

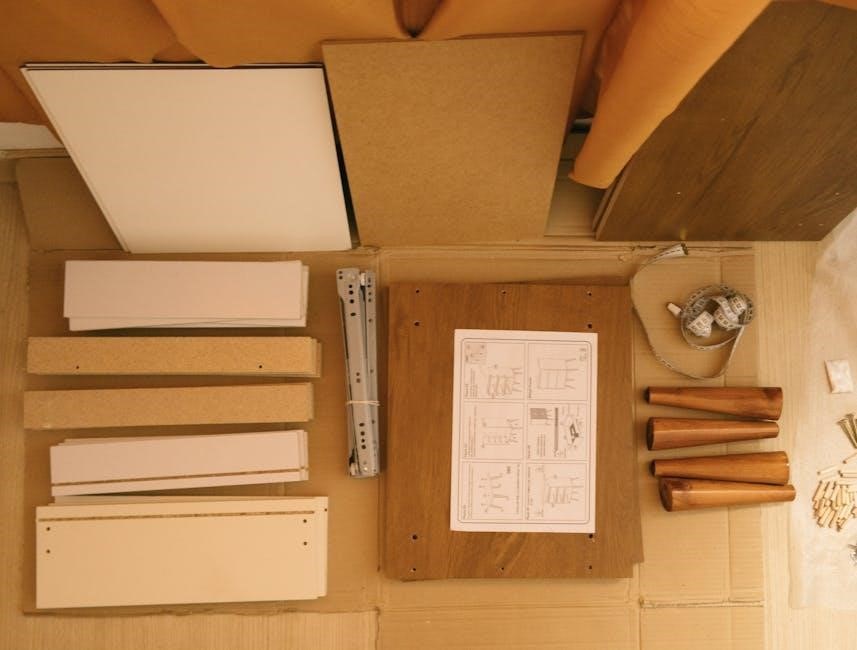
Before beginning assembly‚ carefully inventory all components against the parts list in the Graco crib’s instruction manual (like Graco 04521-331-MB)․ Typically‚ you’ll find a headboard‚ footboard‚ two side rails‚ a mattress support system (often adjustable)‚ and necessary hardware – screws‚ bolts‚ and potentially wood dowels․

If your model includes a changing table‚ expect additional parts like a changing pad‚ drawer slides‚ and drawer components․ Conversion kits‚ purchased separately for the full-size bed stage‚ will contain side rails and support slats specific to a full mattress․

Missing parts are a common assembly issue‚ so verifying everything is present before you start saves time and frustration․ The manual will detail each part’s appearance and function; familiarize yourself with these details to ensure correct installation throughout the process․

Tools Required for Assembly

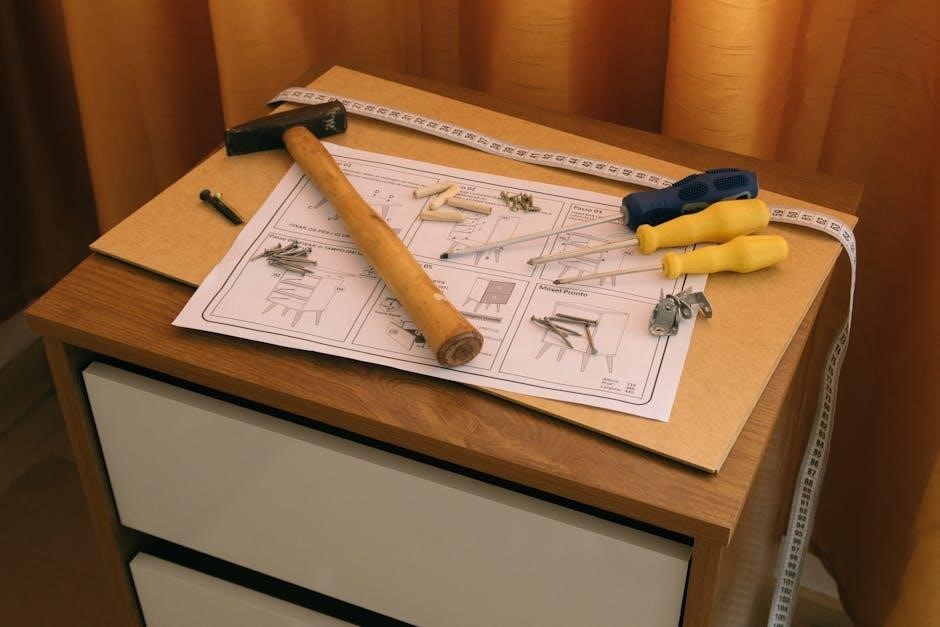
Assembling your Graco 4-in-1 crib generally requires minimal tools‚ contributing to its user-friendly design․ A Phillips head screwdriver is essential for securing most screws and bolts․ While some assemblies can be managed with just this‚ a ratchet set with Phillips head bits can significantly speed up the process․

A rubber mallet can be helpful for gently tapping pieces together‚ particularly when using wood dowels․ A level is crucial for ensuring the mattress support is even and stable․ Though often included‚ a hex key (Allen wrench) may be needed for specific hardware․

Power tools are generally not recommended‚ as they can easily overtighten screws and damage the wood․ Prioritize hand tools for controlled assembly and refer to the manual for specific tool recommendations․

Assembly Instructions: Crib Mode

Graco crib assembly begins with attaching side rails‚ then installing the mattress support‚ and finally securing the headboard and footboard for a stable base․

Attaching the Side Rails

Carefully unpack all components and identify the side rails‚ ensuring you have the correct pieces for each side of the crib․ Typically‚ Graco cribs utilize a bolt and locking washer system to secure the side rails to the headboard and footboard․

Align the pre-drilled holes on the side rails with those on the headboard and footboard․ Insert the bolts through the holes and hand-tighten the locking washers․ Do not fully tighten at this stage; leave some play for alignment during the next steps․

Once all four side rails are loosely attached‚ double-check that the crib frame is square and level․ Now‚ using the provided wrench or Allen key‚ firmly tighten all bolts and locking washers․ Ensure they are snug but avoid over-tightening‚ which could damage the wood․ Regularly inspect these connections for tightness throughout the crib’s use․

Installing the Mattress Support

Locate the mattress support board and the corresponding hardware – often metal brackets and screws․ Graco cribs typically offer multiple height adjustments for the mattress support‚ accommodating your baby’s growth stages․

Select the desired height setting‚ aligning the mattress support brackets with the appropriate slots inside the crib frame․ Insert the screws through the brackets and into the pre-drilled holes in the crib frame‚ hand-tightening initially․

Once all brackets are in place‚ firmly tighten the screws with a screwdriver․ Ensure the mattress support is level and securely fastened․ Regularly check the tightness of these screws‚ especially after converting the crib to different modes․ A properly installed mattress support is crucial for infant safety‚ preventing gaps and ensuring a stable sleep surface․

Securing the Headboard and Footboard

Begin by positioning the headboard and footboard upright‚ ensuring they are oriented correctly – often indicated by pre-drilled holes or decorative features․ Align the headboard and footboard with the side rails‚ utilizing the provided connecting hardware‚ typically bolts and locking washers․

Insert the bolts through the side rails and into the corresponding holes in the headboard and footboard; Securely fasten with the locking washers and nuts‚ hand-tightening initially to allow for adjustments․

Once all connections are made‚ firmly tighten the bolts with a wrench or Allen key․ Verify the headboard and footboard are stable and securely attached to the side rails‚ creating a rigid crib structure․ Regularly inspect these connections for tightness‚ especially after any crib mode conversions․

Conversion to Toddler Bed

Transitioning to toddler mode involves removing the crib side rails and installing a dedicated toddler guardrail for safety‚ alongside mattress support adjustments․

Removing Crib Side Rails

To safely convert your Graco 4-in-1 crib to a toddler bed‚ the first step is carefully removing the crib side rails․ Begin by loosening all screws or bolts securing the rails to the headboard and footboard – do not fully remove them yet․ Support the rail while loosening the final fasteners to prevent accidental dropping․

Once all hardware is loosened‚ gently lift the side rail upwards and outwards‚ detaching it from the crib frame․ It’s helpful to have a second person assist with this step‚ especially for larger rails․ Repeat this process for the opposite side rail․

Important: Retain all removed hardware (screws‚ bolts‚ and any connecting pieces) in a safe place‚ as you may need them when converting the crib back to its original configuration or for future assembly needs․ Ensure the crib frame is stable after rail removal before proceeding to the next step․

Installing the Toddler Guardrail

After removing the crib side rails‚ installing the toddler guardrail is crucial for your child’s safety․ Locate the toddler guardrail kit – it may have been included with the crib or purchased separately․ Align the guardrail with the designated mounting points on the crib frame‚ typically on one side where a side rail was previously attached․

Secure the guardrail using the provided screws or bolts‚ ensuring they are tightened firmly but not over-tightened․ Double-check that the guardrail is securely fastened and doesn’t wobble․ The guardrail should extend along a significant portion of the crib’s length‚ preventing accidental roll-offs․

Verify the guardrail’s stability by applying gentle pressure․ A properly installed guardrail is essential for a safe transition to the toddler bed configuration‚ providing a secure sleep environment for your growing child․

Adjusting Mattress Support for Toddler Mode

When converting your Graco 4-in-1 crib to toddler mode‚ lowering the mattress support is a vital safety step․ This prevents your increasingly mobile toddler from climbing out of the crib․ Locate the mattress support adjustment mechanism – typically involving lowering the metal supports within the crib frame․

Carefully detach and reposition these supports to the lowest setting․ Ensure the mattress rests securely on the adjusted supports‚ maintaining a firm and level sleep surface․ Double-check that all supports are locked into place‚ preventing accidental raising․

A lower mattress position significantly reduces the risk of falls and provides a safer environment as your child begins to stand and explore․ Regularly inspect the support system for any signs of loosening or damage․

Conversion to Daybed Mode

To transition to daybed mode‚ simply remove the toddler guardrail‚ utilizing the existing crib frame as a comfortable and stylish daybed structure․

Removing Toddler Guardrail

Transitioning your Graco 4-in-1 crib to daybed mode begins with the safe removal of the toddler guardrail․ Carefully inspect the guardrail’s attachment points‚ typically secured with bolts or hooks‚ referencing your specific model’s assembly instructions for precise details․

Loosen and detach all fasteners‚ ensuring you retain them in a safe place for potential future re-installation․ Gently lift the guardrail‚ maneuvering it to clear the crib frame․ It’s often helpful to have a second person assist with this step‚ especially with larger guardrails․

Once removed‚ inspect the crib frame for any remaining hardware or sharp edges․ Ensure all surfaces are smooth and free of protrusions to prevent accidental injury․ Proper removal of the guardrail is crucial for creating a safe and functional daybed configuration․

Utilizing Existing Crib Frame

Converting your Graco 4-in-1 crib to daybed mode cleverly utilizes the existing crib frame‚ minimizing the need for additional purchases․ After removing the toddler guardrail‚ the crib essentially transforms into an open daybed platform․

Ensure the mattress support is positioned at the lowest setting to maintain a safe height for your child․ This prevents accidental roll-offs and provides easy access․ The inherent stability of the crib frame provides a secure base for the mattress․

Consider adding soft bedding and pillows to enhance comfort and create a cozy daybed environment․ Regularly inspect the frame for any loose hardware or structural weaknesses‚ maintaining a safe and reliable sleeping or lounging space for your growing child․

Conversion to Full-Size Bed

Transitioning to a full-size bed requires a separate conversion kit‚ attaching to the existing headboard and footboard for extended use and comfort․

Purchasing and Installing the Full-Size Bed Conversion Kit

To convert your Graco 4-in-1 crib to a full-size bed‚ a dedicated conversion kit is essential‚ as it isn’t included with the initial crib purchase․ These kits are readily available from major retailers like Amazon and through the Graco website‚ ensuring compatibility with your specific crib model – verifying the model number is crucial before ordering․

Installation typically involves attaching side rails and a center support beam to the existing headboard and footboard of the crib․ The kit will include all necessary hardware‚ and the instruction manual provides a step-by-step guide․ Carefully follow these instructions‚ ensuring all bolts are securely tightened for stability and safety․ Double-check all connections before allowing a child to use the converted bed․

Remember to retain the original crib instructions for reference‚ as they may contain helpful diagrams or tips․ Proper installation is paramount for a safe and durable full-size bed․

Attaching the Headboard and Footboard to the Kit

Once the full-size bed conversion kit’s frame is assembled‚ the next step involves securely attaching the existing Graco crib’s headboard and footboard․ This process utilizes the pre-drilled holes on both the kit’s frame and the crib components‚ ensuring a stable connection․

The conversion kit will provide specific bolts and hardware designed for this attachment․ Carefully align the headboard and footboard with the corresponding points on the kit’s frame‚ and hand-tighten the bolts initially․ Once all bolts are in place‚ use a wrench or screwdriver to fully tighten them‚ ensuring a firm and secure fit․

Double-check all connections to confirm stability before proceeding․ A wobbly connection could compromise the bed’s integrity and pose a safety risk․ Refer to the kit’s instruction manual for detailed diagrams and torque specifications․

Adding Mattress Support for Full-Size Bed

With the headboard and footboard securely attached to the full-size conversion kit‚ the final step is installing the mattress support system․ The conversion kit will include slats or a platform designed to support a standard full-size mattress‚ differing from the crib’s adjustable mattress height options․

Carefully position the slats or platform within the kit’s frame‚ ensuring they are evenly spaced and securely fastened․ Most kits utilize screws or bolts to secure the support‚ providing a stable base for the mattress․ Verify that all screws are tightened appropriately‚ avoiding over-tightening which could damage the frame․

Before placing the mattress‚ inspect the support system for any gaps or instability․ A properly installed support is crucial for safety and comfort․ Always use a full-size mattress designed for use with a bed frame․

Safety Considerations & Recall Information

Prioritize hardware tightening and entrapment hazard checks; past Graco & Simplicity recalls involved suffocation risks‚ emphasizing vigilant assembly and ongoing safety inspections․

Ensuring Proper Hardware Tightening

Consistent and thorough hardware tightening is paramount for Graco 4-in-1 crib safety․ Regularly inspect all bolts‚ screws‚ and connections‚ ensuring they remain firmly secured throughout the crib’s lifespan and each conversion stage․

Loose hardware presents a significant safety hazard‚ potentially leading to structural instability and creating gaps where a child could become entrapped․ Utilize the appropriate tools – often included with the crib – and avoid over-tightening‚ which can strip threads or damage the wood․

Pay particular attention to connections between the side rails‚ headboard‚ footboard‚ and mattress support․ A wobble or any movement indicates a need for re-tightening․ Document tightening checks as part of routine nursery maintenance‚ especially after converting the crib to different modes (toddler bed‚ daybed‚ full-size bed)․

Remember‚ consistent vigilance regarding hardware is a crucial preventative measure against potential accidents․

Checking for Entrapment Hazards

Regularly inspect your Graco 4-in-1 crib for potential entrapment hazards‚ a critical safety measure given past recalls involving Graco and Simplicity cribs․ Focus on areas where a child’s head‚ limbs‚ or clothing could become caught․

Specifically‚ examine the spaces between the mattress and the crib sides‚ ensuring they are within the required safety standards – no more than two finger widths apart․ Check for any loose or protruding hardware‚ sharp edges‚ or gaps in the headboard or footboard․

As the crib converts to different modes‚ reassess these potential hazards․ Ensure the toddler guardrail is securely attached and doesn’t create openings․ Be mindful of any decorative elements that could pose a risk․ Prioritize a consistently safe sleep environment through diligent hazard checks․

Remember‚ proactive inspection is key to preventing tragic accidents․

Graco & Simplicity Crib Recall History (CPSC Information)

Historically‚ both Graco and Simplicity cribs have been subject to significant recalls‚ primarily due to entrapment and suffocation hazards‚ as reported by the Consumer Product Safety Commission (CPSC)․ Approximately one million cribs were recalled after reports of at least three infant deaths linked to entrapment․

These recalls often stemmed from issues with drop-side mechanisms or faulty hardware‚ creating dangerous gaps where children could become lodged․ The CPSC strongly urged consumers to stop using recalled cribs immediately and to contact Graco or Simplicity for remedies․

It’s crucial to check the CPSC website (www․cpsc․gov) for the latest recall information and to verify if your specific crib model is affected․ Registering your crib with Graco also ensures you’ll receive recall notifications․ Prioritize safety by staying informed․

Troubleshooting Common Assembly Issues

Common problems include missing parts‚ difficulty with hardware‚ or unclear instructions; ensure all components are present and follow the manual closely for smooth assembly․

Missing Parts

Discovering missing components during Graco 4-in-1 crib assembly is a frustrating‚ yet relatively common‚ issue․ First‚ meticulously re-check all packaging materials – sometimes smaller hardware items are concealed within the cardboard or taped to larger pieces․ Carefully compare the physical parts against the detailed parts list included in the assembly manual; this list is crucial for identifying exactly what’s absent․

If a part is genuinely missing‚ do not attempt to substitute with non-Graco hardware‚ as this could compromise the crib’s structural integrity and safety․ Contact Graco customer support directly; they typically offer replacement parts free of charge‚ often requiring only the crib model number and a description of the missing item․ Be prepared to provide proof of purchase‚ such as a receipt or order confirmation․ Allow several business days for shipping and delivery of the replacement part before resuming assembly․

Difficulty with Hardware

Encountering issues with the Graco crib hardware is frequent during assembly․ Often‚ the problem isn’t a missing piece‚ but difficulty correctly identifying or utilizing the provided screws‚ bolts‚ and dowels․ The assembly manual’s diagrams are key; carefully study them to ensure you’re using the correct hardware for each step․ Some users report screws being difficult to tighten fully‚ requiring firm‚ even pressure with the appropriate tool;

Avoid over-tightening‚ as this can strip the screw holes or damage the wood․ If a screw feels stuck‚ try reversing it slightly before re-attempting to tighten․ If you’re struggling‚ double-check the alignment of the connecting pieces․ If hardware continues to be problematic‚ contact Graco customer support; they can offer guidance or send replacements if a piece is defective․

Unclear Instructions

Many users report that the Graco 4-in-1 crib assembly instructions‚ while generally adequate‚ can sometimes be unclear or lack sufficient detail․ Diagrams‚ while present‚ may not always clearly illustrate the orientation of parts or the precise sequence of steps․ This can lead to confusion‚ particularly for first-time parents assembling a crib․ Online resources‚ such as video tutorials created by other customers‚ can be invaluable in supplementing the printed manual․

Carefully reviewing the instructions before beginning assembly is crucial․ Pay close attention to the hardware identification section․ If a step remains unclear‚ try searching online forums or contacting Graco customer support for clarification․ Taking your time and double-checking each connection will minimize errors and frustration․

brother p touch label maker instructions

Brother P-Touch label makers offer versatile solutions for organization, utilizing genuine cartridges and user-friendly software like iPrint&Scan.

These devices streamline labeling tasks, from home projects to professional filing, with diverse tape options and convenient mobile app integration.

What is a Brother P-Touch Label Maker?

Brother P-Touch label makers are compact, portable devices designed for creating customized labels. They utilize thermal transfer technology, meaning no ink is required – the image is created by heat on the tape.

These machines accept specialized Brother tape cartridges containing both the ribbon and the label material; They’re ideal for home, office, and various organizational needs, offering features like font selection, symbol integration, and template options, often controllable via a dedicated app like iPrint&Scan.

Popular Brother P-Touch Models

Several Brother P-Touch models cater to diverse needs. The PT-300 is a basic, cost-effective option, while the P-Touch Cube Plus offers smartphone connectivity via the iPrint&Scan app.

For higher volume and advanced features, models like the PT-P710BT provide Bluetooth connectivity and wider tape compatibility. Other popular choices include the PT-2730 and various handheld options, each with varying capabilities and price points.

Getting Started: Basic Operations

Brother P-Touch setup involves installing batteries, loading a compatible tape cartridge, and powering on the device for immediate labeling convenience.

Installing the Batteries

To install batteries in your Brother P-Touch, locate the battery compartment, typically on the back or bottom of the device. Open the compartment cover and insert the required number of batteries – usually AAA or AA – ensuring correct polarity (+ and -) as indicated inside.

Securely close the battery cover. Low battery indicators will alert you when replacement is needed, ensuring uninterrupted labeling. Always handle batteries safely and dispose of them properly.

Loading the Label Tape

Loading label tape is straightforward. Open the label compartment, usually by lifting a cover. Insert the Brother tape cartridge with the label side facing up, ensuring it clicks into place.

Feed the tape through the guides and rollers, following the diagram inside the compartment. Proper loading ensures smooth printing and prevents tape jams. Use genuine Brother cartridges for optimal performance.

Powering On and Off

Powering on your Brother P-Touch is typically done with a dedicated power button, often clearly marked. Press and hold this button briefly to activate the device. To power off, repeat the process – a short press and hold of the power button.

Some models may have an auto-power off feature to conserve battery life when inactive for a period.

Understanding the Control Panel

Brother P-Touch control panels feature keys for text entry, menu navigation, and print settings adjustments. Symbols indicate functions, enabling efficient label customization.

Key Functions and Symbols

Brother P-Touch control panels utilize distinct keys for essential operations. The ‘Print’ button initiates label creation, while arrow keys navigate menus and edit text. ‘Backspace’ corrects errors, and ‘Shift’ accesses alternate characters. Symbols represent functions like font size, style, and border options.

Understanding these icons—often depicting underlining, bolding, or frame styles—is crucial for customizing labels. The ‘Cut’ button cleanly separates printed labels, ensuring professional results. Refer to your model’s manual for specific symbol definitions.

Navigating the Menu

Brother P-Touch menu navigation typically employs arrow keys – up, down, left, and right – to scroll through options. The ‘OK’ or ‘Enter’ button confirms selections. Use ‘Cancel’ or ‘Escape’ to return to previous screens.

Menus organize settings like font, style, tape width, and template choices. Explore submenus for advanced customization. Wireless models feature network setup within the menu system, enabling connectivity via iPrint&Scan. Consult your user manual for a detailed menu map.

Adjusting Print Settings

Brother P-Touch allows customization of print settings via the control panel. Adjust font size and style for readability. Select desired print speed and repetition for multiple labels. Modify the length of each label to fit your needs.

Explore options for underlining, bolding, and italics. Utilize the preview function to visualize the final output before printing. Access these settings through the menu, ensuring optimal label clarity and appearance.

Creating Your First Label

Begin by entering text and numbers using the keypad. Select a font size and style, then choose a pre-designed label template for quick formatting.

Entering Text and Numbers

Utilize the on-screen keyboard to input your desired text directly into the Brother P-Touch label maker. Navigate through letters, numbers, and symbols using the control panel’s directional keys.

Confirm each character before proceeding. The device allows for a specific character limit per label, displayed on the screen. Remember to double-check your input for accuracy, as errors require re-entry.

Consider using the preview function to visualize the final label before printing, ensuring correct spelling and formatting.

Selecting Font Size and Style

Access the font options through the label maker’s menu system, typically navigated using the control panel buttons. Brother P-Touch devices offer a range of pre-installed fonts, allowing customization of label appearance.

Adjust font size to fit the label width and ensure readability. Preview the selected font and size before printing to confirm suitability. Explore different styles – bold, italic, underline – to emphasize key information.

Experiment to find the optimal combination for clarity and visual appeal.

Choosing a Label Template

Brother P-Touch label makers include pre-designed templates for common applications, streamlining the labeling process. Access these templates via the device’s menu, categorized by use – address, file folders, or barcodes.

Templates provide pre-formatted layouts, saving time and ensuring consistency. Select a template that closely matches your needs, then customize the text and details.

Utilize templates for quick, professional-looking labels, or create custom designs for unique applications.

Advanced Features & Customization

Brother P-Touch allows for enhanced label creation, including built-in symbols, custom templates, and decorative elements like borders and frames for personalization.

Using Built-in Symbols

Brother P-Touch label makers boast a comprehensive library of pre-designed symbols accessible directly through the control panel. These symbols enhance label clarity and visual appeal, representing various categories like office supplies, warning signs, or organizational icons.

Navigating the symbol menu is straightforward, allowing users to quickly insert relevant icons into their labels. This feature eliminates the need for manual drawing, saving time and ensuring professional-looking results. Explore the options to find the perfect symbol for every labeling need!

Creating Custom Templates

Brother P-Touch label makers empower users to design personalized templates for frequently used labels. Utilizing the P-Touch Editor software (PC/Mac) or the iPrint&Scan app, you can save custom layouts with specific fonts, sizes, and symbol placements.

This feature streamlines repetitive tasks, ensuring consistency across all your labels. Save time and effort by creating templates for address labels, file folders, or any other labeling requirement, readily available for future use.

Adding Borders and Frames

Brother P-Touch label makers enhance label aesthetics with built-in border and frame options. Through the P-Touch Editor software or iPrint&Scan app, users can easily select from various styles to surround their text.

These decorative elements add visual appeal and help labels stand out. Customize borders with different thicknesses and patterns, creating professional-looking labels for diverse applications, from gift tags to organizational purposes.

Connectivity and Software

Brother offers iPrint&Scan for iOS/Android and P-Touch Editor for PC/Mac, enabling label creation without a direct device connection. Wireless models simplify setup.

Brother iPrint&Scan App (iOS & Android)

Brother iPrint&Scan empowers users to directly utilize their P-Touch label maker’s features from a smartphone or tablet, eliminating the need for a computer connection. Available on both Apple iOS and Android devices, this application facilitates seamless label design and printing.

Download the app from respective app stores to access a range of functionalities, streamlining label creation on the go and enhancing overall convenience.

Brother P-Touch Editor Software (PC/Mac)

Brother P-Touch Editor software provides comprehensive label design capabilities for both PC and Mac users. This software unlocks advanced features, allowing for intricate label customization beyond the basic functions of the device itself.

Users can download the software from the Brother website to access printing, scanning, and workflow functionalities, creating professional-quality labels with ease and precision.

Wireless Connection Setup

Wireless connection allows label creation directly from smartphones or computers without a physical cable. For setup, navigate to the machine’s settings and select your Wi-Fi network.

Ensure your label maker is within range of the router. Utilize the Brother iPrint&Scan app for streamlined connectivity and label design, offering convenient wireless printing options for enhanced productivity.

Troubleshooting Common Issues

Tape jams, faded prints, or connectivity problems are easily addressed by checking tape installation, battery levels, and network settings.

Refer to the user manual for detailed solutions and error code explanations.

Tape Jams and Errors

Tape jams frequently occur due to improper tape loading or debris within the mechanism. Gently remove the tape cassette and reinsert it, ensuring it clicks into place;

If errors persist, carefully inspect the tape path for any obstructions. Utilize the manual cutter to trim any tangled tape.

Consult the user manual for specific error codes displayed on your Brother P-Touch, as these indicate the nature of the problem and suggest solutions.

Printing is Faded or Incorrect

Faded prints often indicate low battery power; replace batteries immediately. Ensure you’re using genuine Brother tape cartridges, as non-genuine tapes can yield poor results.

Incorrect printing may stem from improper print settings within the device or the iPrint&Scan app.

Verify font size, style, and darkness settings. Clean the print head gently with a dry cloth to remove any accumulated residue for optimal clarity.

Connectivity Problems

If experiencing wireless connection issues, confirm your Brother P-Touch is within range of your Wi-Fi network. Restart both the label maker and your router.

Ensure the correct network password is entered during setup via the Brother iPrint&Scan app.

Check for firmware updates on the Brother website, as these often include connectivity improvements. Temporarily disable firewalls or security software that might be interfering with the connection.

Maintenance and Care

Brother P-Touch label makers require regular cleaning of the tape cutter and occasional blade replacement for optimal performance and longevity.

Proper storage protects the device.

Cleaning the Tape Cutter

To maintain your Brother P-Touch, regularly clean the tape cutter. Accumulated adhesive residue can hinder smooth operation. Gently remove any visible debris using a dry, soft cloth.

Avoid using solvents or abrasive cleaners, as these can damage the cutter mechanism. For stubborn residue, lightly dampen the cloth with water, ensuring it’s not overly wet.

A clean cutter ensures precise label separation and extends the life of your label maker.

Replacing the Cutter Blade

When labels aren’t cleanly cut, the cutter blade may need replacing. Access the blade compartment, typically located near the tape cutter. Carefully remove the old blade, noting its orientation for correct installation.

Insert the new blade, ensuring it clicks securely into place. Avoid touching the blade’s cutting edge to prevent injury.

A sharp blade guarantees clean label separation and optimal P-Touch performance.

Storing Your Label Maker

To prolong the life of your Brother P-Touch, store it in a cool, dry place, away from direct sunlight and extreme temperatures. Remove the batteries if the device will be unused for an extended period to prevent corrosion.

Protect the cutter blade during storage; consider covering it with a protective cap if available.

Proper storage ensures your label maker remains in optimal working condition.

Genuine Brother Tape Cartridges

Brother recommends using genuine tape cartridges for optimal performance and reliability. They ensure consistent print quality and compatibility with your P-Touch.

Types of Tape Available

Brother P-Touch label makers support a wide array of tape types, catering to diverse needs. Options include laminated tapes for durability, non-laminated for cost-effectiveness, and specialized tapes like strong adhesive or extra-durable varieties.

Furthermore, you can find tapes with different widths, colors (including clear and metallic), and even pre-printed designs. The split-peel backing facilitates easy application, while choices extend to fabric tapes for crafting projects.

Benefits of Using Genuine Cartridges

Brother strongly recommends utilizing genuine P-Touch cartridges for optimal performance and longevity. These cartridges are engineered to work seamlessly with your label maker, ensuring consistent print quality and preventing potential damage to the device’s internal mechanisms.

Genuine tapes deliver superior adhesion and durability, resisting fading and peeling. Using non-genuine tapes may void your warranty and compromise the overall labeling results.

Compatibility with Different Models

Brother P-Touch label makers boast a wide range of compatible tape cartridges, though specific options vary by model. Always consult your device’s user manual or the Brother website to confirm the correct tape type for your machine.

Certain models support laminated tapes, while others are designed for standard options. Utilizing the recommended cartridges ensures optimal adhesion and print quality across all P-Touch devices.

Label Applications & Ideas

Brother P-Touch label makers excel at home organization, office filing, and cable identification, offering practical solutions for diverse labeling needs with customized templates.

Home Organization Labels

Brother P-Touch label makers are ideal for decluttering and organizing your home! Create clear, durable labels for pantry items, storage bins, and kids’ toys, enhancing accessibility and visual appeal.

Utilize various fonts and symbols to categorize belongings effectively. Label maker tapes resist fading, ensuring long-lasting organization. From kitchen containers to linen closets, achieve a tidy and efficient living space with customized labels.

Office and Filing Labels

Brother P-Touch label makers significantly improve office efficiency! Create professional-looking labels for files, folders, binders, and shelves, streamlining document management and retrieval.

Clearly identify contents for quick access, boosting productivity. Utilize templates and various font sizes for a consistent, organized appearance. Durable labels withstand frequent handling, ensuring long-term clarity in busy office environments. Enhance your workspace with professional labeling!

Cable and Wire Identification

Brother P-Touch labelers are ideal for organizing complex cabling systems. Clearly label network cables, power cords, and wires during installation or troubleshooting, preventing confusion and saving time.

Use durable, laminated tapes to withstand harsh environments and abrasion. Accurate identification simplifies maintenance and upgrades. Avoid disconnecting the wrong cable – a properly labeled system ensures efficient and reliable connectivity for all your devices!

Safety Precautions

Handle batteries with care, avoiding damage to the device. Properly dispose of used tapes and cartridges, following local regulations for environmental safety.

Handling Batteries Safely

Always insert batteries with correct polarity, as indicated. Avoid mixing old and new batteries, or different battery types. Remove batteries if the device will not be used for an extended period to prevent leakage and corrosion. Keep batteries away from heat and direct sunlight. Dispose of used batteries responsibly, following local environmental regulations for battery recycling or proper disposal – do not simply discard them with regular trash.

Avoiding Damage to the Device

Protect your Brother P-Touch from liquids and excessive force. Do not attempt to disassemble or repair the device yourself; contact authorized service personnel for assistance. Avoid dropping the label maker, as this can damage internal components. Ensure the tape cutter blade is handled with care to prevent injury and maintain functionality. Keep the device clean and free from dust and debris.

Proper Disposal of Used Tapes

Dispose of used Brother P-Touch tape cartridges responsibly, following local regulations for plastic waste. Do not discard tapes with hazardous materials. Consider recycling options if available in your area. Empty the cassette completely before disposal. Avoid littering with used tapes. Check your community guidelines for proper plastic recycling procedures, ensuring environmental protection and responsible waste management.

Downloading User Manuals

Access comprehensive Brother P-Touch manuals directly from the official Brother website, offering detailed instructions and support resources for your specific model.

Finding Manuals on the Brother Website

To locate your Brother P-Touch label maker’s manual, navigate to the official Brother support website. Utilize the search bar, entering your model number for precise results.

Alternatively, browse by product category – selecting “Label Printers” – and then filtering by your specific P-Touch model. Downloadable PDFs are readily available, providing detailed operational guidance, troubleshooting tips, and safety precautions for optimal use.

Accessing Online Support Resources

Brother provides extensive online support for P-Touch label makers. Explore their support website for FAQs, troubleshooting guides, and video tutorials addressing common issues.

The Brother support community forums offer peer-to-peer assistance and solutions. Additionally, iPrint&Scan app support and software downloads are available, ensuring you have the resources needed for seamless label creation and device operation.

Warranty Information

Brother P-Touch label makers come with a limited warranty covering defects in materials and workmanship. Product registration enhances warranty benefits and support access.

Brother P-Touch Label Maker Warranty Details

Brother offers a one-year limited warranty on P-Touch label makers from the date of original purchase. This warranty covers defects in materials and workmanship under normal use. It does not cover issues arising from misuse, accidents, or unauthorized repairs.

The warranty includes repair or replacement at Brother’s discretion. To obtain warranty service, proof of purchase is required. Extended warranties may be available for purchase separately, providing additional coverage and peace of mind.

Registering Your Product

Registering your Brother P-Touch label maker online is highly recommended. This allows Brother to provide you with important product updates, promotional offers, and faster warranty service if needed. Registration typically requires your model number and serial number, found on the device itself.

Visit the official Brother website to locate the product registration page and complete the simple online form. It’s a quick process that enhances your ownership experience.

rival rice maker instructions

Rival Rice Maker Instructions: A Comprehensive Guide

Discover effortless cooking with Rival rice cookers! This guide provides detailed instructions, troubleshooting, and safety tips for optimal performance and delicious results.

Rival rice cookers offer a convenient and reliable way to prepare perfectly cooked rice every time. From basic models to those with advanced features, Rival caters to diverse cooking needs. Finding Rival online manuals, including those for Delron models, is often possible through various databases. These cookers simplify meal preparation, eliminating guesswork and ensuring consistent results. Whether you’re a seasoned chef or a beginner, a Rival rice cooker is a valuable addition to your kitchen, offering ease of use and dependable performance.

Understanding Your Rival Rice Cooker Model

Identifying your specific Rival model number – like RC101 or 4356 – is crucial for accessing the correct user manual and instructions. These manuals detail unique features and settings. Familiarize yourself with key components; understanding these parts ensures proper operation and maintenance. Online resources offer downloadable manuals for various Rival cookers. Knowing your model allows you to troubleshoot effectively and maximize your cooking experience, ensuring perfectly cooked rice and steamed dishes every time.

Identifying Your Specific Model Number

Locating your Rival rice cooker’s model number is the first step towards accessing tailored support and instructions. Typically, this number is found on a sticker located on the bottom or back of the unit. It’s essential for downloading the correct user manual online, as different models have varying features and settings. Knowing your model – such as RC101, 4356, or 4450 – unlocks specific cooking guidelines and troubleshooting advice, guaranteeing optimal performance and delicious results.

Key Components of a Rival Rice Cooker

Understanding the parts of your Rival rice cooker ensures proper use and maintenance. Core components include the outer housing, removable inner cooking pot (often non-stick), a heating plate, a condensation collector, and the lid with a steam vent. Some models feature a steaming basket for simultaneous food preparation. Familiarize yourself with the control panel, including the “Cook” and “Warm” settings, and the power cord. Knowing these elements facilitates efficient operation and extends the lifespan of your appliance.

Preparing to Cook: Essential Steps

Before you begin, proper preparation is key for perfectly cooked rice. Accurately measure your rice using a standard measuring cup. Thoroughly wash the rice in a separate bowl under cold water until the water runs clear, removing excess starch. This step improves texture. Determine the correct water-to-rice ratio based on the type of rice you’re using – white, brown, jasmine, or basmati – consulting your model’s instructions for best results.

Measuring Rice Accurately

Consistent measurements are crucial for successful rice cooking; Always use a standard measuring cup – typically marked in cups and milliliters – to ensure the correct rice-to-water ratio. Avoid using cutlery or estimating, as this can lead to inconsistent results. Level off the rice in the measuring cup for precise amounts. Note that different rice varieties may have slightly different volume-to-weight ratios, so refer to specific guidelines when available.

Washing the Rice for Optimal Results

Rinsing rice before cooking removes excess starch, resulting in fluffier, less sticky grains. Place the measured rice in a bowl and cover with cold water. Gently swirl the rice with your hand, then drain the cloudy water. Repeat this process several times – typically 3-5 times – until the water runs relatively clear. This step significantly improves the texture of the cooked rice, preventing it from becoming gummy or clumping together during the cooking process.

Water-to-Rice Ratio Guidelines

Achieving perfectly cooked rice relies on the correct water-to-rice ratio. For white rice, a general guideline is a 1:1 ratio – one cup of rice to one cup of water. Brown rice typically requires more water, around 1 cup of rice to 2.25-2.5 cups of water. Jasmine and Basmati rice may need slightly less. Always refer to your specific Rival model’s instructions, as variations exist. Adjust slightly based on desired texture; less water for firmer rice, more for softer.

Basic Cooking Instructions: White Rice

Begin by adding the measured and washed white rice to the Rival rice cooker. Then, carefully add the appropriate amount of water, following the water-to-rice ratio guidelines for your model. Secure the lid tightly. Select the “Cook” setting on your Rival cooker. The cooking cycle will automatically begin, and the cooker will switch to the “Warm” setting when finished. Allow the rice to rest for 10 minutes before fluffing and serving for optimal texture and flavor.

Adding Rice and Water to the Cooker

First, measure the desired amount of rice and gently place it into the inner cooking pot of your Rival rice cooker. Ensure the rice is evenly distributed. Next, carefully pour in the required water, referencing the water-to-rice ratio specific to your model and the type of white rice you’re using. Avoid exceeding the maximum fill line indicated inside the cooker. Securely position the inner pot within the cooker before closing the lid.

Selecting the “Cook” Setting

Once the lid is securely closed, locate the “Cook” setting on your Rival rice cooker. This is typically a switch or button that you press to initiate the cooking cycle. For basic white rice, simply select the “Cook” setting. Some models may have specific settings for different rice types; ensure you’ve chosen the appropriate one. The indicator light will illuminate, signaling that the cooking process has begun. Avoid lifting the lid during cooking to maintain optimal temperature and steam.

The Cooking Cycle and Automatic Shut-Off

During the cooking cycle, the Rival rice cooker will automatically adjust the temperature to perfectly cook your rice. Resist the urge to lift the lid, as this releases steam and affects the cooking process. Once the rice has finished cooking, the cooker will automatically switch to the “Warm” setting. This feature keeps the rice at a serving temperature without overcooking it. The indicator light will typically change to signify this transition, ensuring perfectly cooked rice every time.

Cooking Different Types of Rice

Rival rice cookers aren’t limited to white rice! Adjustments are needed for optimal results with other varieties. Brown rice requires a longer cooking time and more water – typically a 2:1 water-to-rice ratio. Jasmine and Basmati rice generally need less water, around a 1.5:1 ratio, for a fluffy texture. Experimentation may be needed to find your preferred consistency, as rice types and personal preferences vary; Always refer to package instructions as a starting point.

Brown Rice Cooking Instructions

For perfectly cooked brown rice with your Rival cooker, use a 2:1 water-to-rice ratio. Add the measured brown rice and water to the cooker. Select the appropriate setting – if available, choose a “Brown Rice” setting. Otherwise, use the standard “Cook” setting. The cooking cycle will be longer than white rice, typically 45-50 minutes. Allow the cooker to automatically switch to the “Warm” setting after cooking, and let it rest for 10 minutes before fluffing and serving.

Jasmine Rice Cooking Instructions

To achieve fragrant and fluffy Jasmine rice, a slightly adjusted water ratio is key. Use a 1.5:1 water-to-rice ratio for best results. Combine the measured Jasmine rice and water within the Rival rice cooker. Select the “Cook” setting to initiate the cooking process. Jasmine rice generally cooks faster, around 20-25 minutes. Once the cycle completes and the cooker switches to “Warm”, let it stand for 10 minutes before gently fluffing with a fork and serving this delightful grain.

Basmati Rice Cooking Instructions

For perfectly separated and aromatic Basmati rice, precise measurements are crucial. Employ a 1.75:1 water-to-rice ratio. Thoroughly rinse the Basmati rice until the water runs clear, removing excess starch. Add the rinsed rice and water to your Rival cooker. Select the “Cook” setting and allow approximately 25-30 minutes for the cooking cycle. After automatic shut-off, let the rice rest, covered, for 10 minutes. Gently fluff with a fork to release the grains and enjoy this flavorful side dish.

Steaming with Your Rival Rice Cooker

Expand your culinary options by utilizing the steaming function! Your Rival rice cooker isn’t just for rice; it’s a versatile steamer. Ensure sufficient water is in the base – do not exceed the maximum fill line. Place vegetables or proteins within the included steaming basket, ensuring they aren’t submerged. Select the “Cook” setting, and steam until tender. This method preserves nutrients and delivers healthy, delicious results alongside your perfectly cooked rice.

Using the Steaming Basket

Maximize your Rival cooker’s versatility with the steaming basket! This accessory fits securely inside, elevating food above the boiling water. Ensure the basket sits firmly and doesn’t touch the water. For best results, cut vegetables into uniform sizes for even steaming. Don’t overcrowd the basket; allow steam circulation. The basket is ideal for fish, poultry, and delicate vegetables, offering a healthy, flavorful cooking method alongside rice preparation.

Vegetable Steaming Guide

Achieve perfectly steamed vegetables using your Rival cooker! Add approximately 1-2 cups of water to the inner pot. Place chopped vegetables – broccoli, carrots, or green beans – into the steaming basket. Select the “Cook” setting, and steam for 8-15 minutes, depending on the vegetable and desired tenderness. Check for doneness with a fork. Steaming preserves nutrients and delivers a crisp-tender texture, making it a healthy and delicious side dish option.

Protein Steaming Guide

Effortlessly steam fish, chicken, or dumplings with your Rival rice cooker! Add 1-2 cups of water to the inner pot. Place seasoned protein onto the steaming basket, ensuring it doesn’t touch the water. Select the “Cook” setting and steam for 12-20 minutes, depending on the protein’s thickness and type. Check for internal temperature to ensure it’s fully cooked. Steaming keeps proteins moist and tender, offering a healthy and flavorful meal option.

Advanced Features and Settings

Explore beyond basic cooking! The “Warm” function maintains rice at serving temperature for hours, preventing it from drying out. Some models offer a “Delay Start” for convenient, timed cooking. Specialty settings like “Soup” or “Oatmeal” expand your culinary options. Refer to your specific model’s manual to unlock these features. Utilizing these advanced settings enhances convenience and allows for diverse meal preparation with your Rival rice cooker.

“Warm” Function: Keeping Rice at Serving Temperature

The “Warm” function automatically activates after the cooking cycle completes, transitioning the cooker to a warming mode. This maintains rice at an ideal serving temperature for extended periods – often several hours – without overcooking or drying it out. It’s perfect for staggered mealtimes or keeping rice ready for guests. Simply leave the rice in the cooker, and enjoy perfectly warmed grains whenever you’re ready to eat!

Delay Start Function (If Applicable)

Some Rival rice cooker models feature a convenient delay start function. This allows you to pre-set a cooking time, enabling the cooker to automatically begin cooking later. This is ideal for preparing rice in advance, ensuring a hot meal is ready when you are. Consult your specific model’s manual for detailed instructions on programming the delay start timer, as procedures can vary between different Rival cookers.

Specialty Settings (e.g., Soup, Oatmeal)

Beyond basic rice cooking, certain Rival models boast versatile specialty settings. These can include options for preparing soups, stews, or even oatmeal directly within the cooker. Utilizing these settings often involves adjusting water levels and selecting the appropriate program. Always refer to your user manual for precise instructions and recommended recipes for each specialty function, ensuring optimal results and preventing potential issues with cooking times or textures.

Cleaning and Maintenance

Regular cleaning ensures your Rival rice cooker’s longevity and hygiene. Begin by unplugging the unit and allowing it to cool completely. Disassemble removable parts like the inner pot, steaming basket, and lid, washing them with warm, soapy water. Avoid abrasive cleaners. Carefully wipe the heating plate with a damp cloth; never immerse the base in water. Thoroughly dry all components before reassembling. Consistent maintenance prevents buildup and maintains optimal performance.

Disassembling the Rice Cooker

Before cleaning, safely disassemble your Rival rice cooker. First, ensure the unit is unplugged and cool. Gently lift off the lid. Remove the inner cooking pot and steaming basket, if present. Most models allow for easy removal of these components. Avoid forcing any parts; consult your model’s specific manual if needed. Proper disassembly facilitates thorough cleaning and prevents damage to the cooker’s internal mechanisms, ensuring lasting usability.

Washing Removable Parts

Thoroughly wash the inner pot, lid, and steaming basket with warm, soapy water after each use. Avoid abrasive cleaners, as they can damage the non-stick coating. A soft sponge or cloth is ideal. Rinse all parts completely to remove any soap residue. The inner pot may be dishwasher safe – check your model’s manual for confirmation. Ensure all components are fully dry before reassembling the rice cooker for storage or subsequent use, preventing mildew.

Cleaning the Heating Plate

Carefully wipe the heating plate with a damp, soft cloth after the cooker has completely cooled and is unplugged. Avoid submerging the base unit in water or any liquids. Stubborn food residue can be gently loosened with a plastic scraper, but never use metal utensils. Ensure no water enters the vents or electrical components. A clean heating plate ensures efficient heat transfer and prevents burning smells during future cooking cycles, maintaining optimal performance.

Troubleshooting Common Issues

If rice is mushy, reduce the water-to-rice ratio slightly in subsequent attempts. For dry rice, increase the water. A cooker failing to turn on may indicate a power supply issue; check the cord and outlet. If problems persist, avoid self-repair and consult service instructions. Never attempt internal adjustments, as this voids the warranty. Regularly cleaning and proper usage prevent most issues, ensuring consistent, delicious results with your Rival rice cooker.

Rice is Too Mushy

Mushy rice typically indicates an excess of water used during cooking. For future batches, slightly decrease the water-to-rice ratio. Begin by reducing the water by a tablespoon or two. Ensure accurate measurement of both rice and water is crucial. Avoid lifting the lid during the cooking cycle, as this releases steam and affects the cooking process. Consistent adjustments will help you achieve perfectly textured rice with your Rival cooker.

Rice is Too Dry

Dry rice usually means insufficient water was used during the cooking process. For the next attempt, incrementally increase the water amount – start with an extra tablespoon. Double-check your rice-to-water ratio against the guidelines for your specific rice type. Ensure the heating plate is clean, as residue can affect heat distribution; Remember not to open the lid mid-cycle, preserving essential steam for proper hydration and fluffy results with your Rival rice cooker.

Cooker Won’t Turn On

If your Rival rice cooker fails to power on, first verify the power cord is securely plugged into both the cooker and a functioning outlet. Test the outlet with another appliance to confirm it’s delivering power. Inspect the power cord for any visible damage – do not use if frayed. Avoid attempting self-repair of electrical components; this voids the warranty and poses a safety risk. Contact Rival customer support for assistance or potential service options.

Safety Precautions

Always prioritize safety when using your Rival rice cooker. Ensure proper electrical safety by avoiding use with damaged cords or wet hands. Prevent burns and scalds by carefully handling hot surfaces and steam. Utilize the power cord correctly, avoiding kinks or strain. Never immerse the cooker base in water. Do not attempt to repair electrical or mechanical functions yourself; contact qualified service personnel. Keep the appliance out of reach of children.

Electrical Safety Guidelines

To ensure safe operation, always plug your Rival rice cooker into a grounded outlet. Never operate the appliance with a damaged cord or plug. Avoid using extension cords if possible; if necessary, use a heavy-duty extension cord rated for the cooker’s wattage. Do not immerse the cooker base, cord, or plug in water or other liquids. Unplug the cooker when not in use and before cleaning. Never attempt self-repair of electrical components.

Avoiding Burns and Scalds

Exercise extreme caution when operating your Rival rice cooker, as surfaces become hot during use. Always use oven mitts or pot holders when handling the cooker, lid, and inner pot. Avoid touching hot surfaces directly. Be mindful of escaping steam, which can cause burns; open the lid away from your face and hands. Keep the cooker out of reach of children to prevent accidental burns. Allow the cooker to cool completely before cleaning or storing.

Proper Cord Usage

Ensure safe operation by inspecting the power cord regularly for damage. Never operate the cooker with a damaged cord or plug. Avoid using extension cords; plug directly into a grounded outlet. Do not let the cord hang over the edge of a counter or table, or touch hot surfaces. When unplugging, grasp the plug – never pull the cord. Keep the cord away from heat, oil, and sharp objects to prevent electrical hazards and maintain cooker functionality.

Finding Rival Rice Cooker Manuals Online

Locate your Rival rice cooker manual easily through several online resources. Start with Rival’s official website, then explore online manual databases. Utilize model-specific search terms (e.g., “Rival RC101 manual”) for precise results. Websites often archive older models, like the 4356 or 4450. Remember to verify the manual matches your specific cooker model number for accurate instructions and safety guidelines. Digital copies offer convenient access to cooking guidance.

Rival’s Official Website

Begin your search for Rival rice cooker manuals at the official Rival website. Though specific manual availability varies, it’s the primary source for current and potentially archived documentation. Navigate to the support or customer service section, then look for a manual download area. Utilize the search function, entering your exact model number for targeted results. Check frequently, as content updates occur. If unavailable, explore alternative online databases for your Rival cooker’s instructions.

Online Manual Databases

Numerous online manual databases host user manuals for various appliances, including Rival rice cookers. Websites dedicated to appliance documentation often compile manuals submitted by users or sourced from manufacturers. Explore these platforms using precise search terms – “Rival rice cooker manual” plus your specific model number. Be cautious regarding download sources, prioritizing reputable sites. ManualsLib and similar resources can be valuable, but always verify the manual’s accuracy before use.

Model-Specific Search Tips

Locating the correct manual hinges on your Rival rice cooker’s model number. This is typically found on a sticker underneath the unit or inside the cooker pot. When searching online, include the full model number (e.g., RC101, 4356, 4450) for precise results. Try variations like “Rival RC101 manual PDF” or “Rival 4356 instruction booklet.” If initial searches fail, broaden to include “Delron rice cooker manual” as Rival acquired Delron.

Rival Rice Cooker Model RC101 Specific Instructions

For the Rival RC101, measure rice and wash until water runs clear. Add rice to the cooker, then add water – a 1:1 ratio is standard for white rice. Select the “Cook” setting; the cooker automatically switches to “Warm” upon completion. This model is basic, lacking delay start or specialty settings. Refer to the full RC101 user manual, often available online, for detailed guidance and safety precautions. Remember to always unplug before cleaning!

Rival Rice Cooker Model 4356 Specific Instructions

The Rival 4356 model, a popular automatic rice cooker/steamer, requires careful attention to water levels. Begin by measuring your desired rice amount and washing thoroughly. Add rice and water – typically a 1:2 ratio for white rice, adjusting for brown or other varieties. Select the appropriate cooking cycle. This model may include steaming capabilities using its included basket. Always consult the full manual, as it’s difficult to find, for specific settings and safety guidelines.

Rival Rice Cooker Model 4450 Specific Instructions

For the Rival 4450, ensure the inner pot is securely placed before operation. Measure rice accurately and wash until the water runs clear. A standard water-to-rice ratio of 1:2 works well for most white rice types. Select the ‘Cook’ setting and allow the automatic cycle to complete. This model benefits from careful cleaning of the heating plate to maintain optimal performance. Refer to available online resources, as dedicated manuals are scarce, for detailed guidance.

sharp portable air conditioner instruction manual

Welcome! This manual guides installation and operation of your Sharp portable air conditioner, designed for cooling, dehumidifying, and ventilation within your home environment.

What’s Included in the Box

Carefully unpack your Sharp portable air conditioner and verify that all components are present. Your package should contain the following items: one (1) portable air conditioner unit itself, ensuring it’s free from shipping damage. You’ll also find one (1) remote control for convenient operation from a distance. A crucial component is the air outlet hose, essential for expelling warm air outside.

Additionally, there’s a packing material used for device protection during transit, and of course, this comprehensive instruction manual to guide you through setup and use. Some models may include a window kit for easy installation in standard windows. Please check the contents against the packing list to confirm everything is accounted for before proceeding. Retain the original packaging for potential future transport or warranty claims.

Safety Precautions

To ensure safe operation, please read these precautions carefully before using your Sharp portable air conditioner. Always ensure the unit is properly grounded to prevent electrical shock. Do not operate with a damaged power cord or plug. Avoid using extension cords; plug directly into a suitable outlet.

Keep the air inlet and outlet clear of obstructions. Never insert objects into the unit. Do not use near flammable materials or gases. Regularly clean the air filter to maintain performance and air quality. Disconnect the unit during cleaning or maintenance. If the unit malfunctions, do not attempt repairs yourself; contact qualified service personnel. This appliance is not intended for use by persons (including children) with reduced physical, sensory or mental capabilities.

Understanding Your Air Conditioner’s Components

Familiarize yourself with the unit’s parts: front panel controls, rear exhaust hose connection, and the included remote control for optimal functionality.

Front Panel Controls

The front panel houses the intuitive controls for your Sharp portable air conditioner. Typically, you’ll find a power button to initiate operation, alongside mode selection buttons for cooling, dehumidification, and fan-only functions. Temperature adjustment buttons, often indicated with up and down arrows, allow precise climate control.

Fan speed settings, usually low, medium, and high, are also accessible here, enabling you to customize airflow. A timer button facilitates automated operation, setting desired run times. Some models feature a sleep mode button, optimizing comfort during rest. Indicator lights clearly display the selected mode, temperature, and timer status, providing immediate feedback on the unit’s operation. These controls offer convenient, on-unit management of your air conditioning experience.

Rear Panel Features (Exhaust Hose Connection)

The rear panel is dedicated to essential ventilation. It prominently features the exhaust hose connection, a crucial component for expelling warm air generated during the cooling and dehumidification processes. This connection ensures efficient operation by preventing heat recirculation into the room.

Proper attachment of the exhaust hose is vital; a secure fit minimizes warm air leakage, maximizing cooling performance. You’ll find a designated port for the hose, often with a threaded or snap-lock mechanism. Air intake vents are also located on the rear panel, drawing in fresh air for cooling. Ensure these vents remain unobstructed for optimal airflow. Ignoring these features can compromise the unit’s efficiency and potentially lead to overheating.

Remote Control Overview

Your Sharp portable air conditioner includes a convenient remote control for effortless operation from a distance; The power button initiates or terminates operation, while the ‘Mode’ button cycles through cooling, dehumidification, and fan-only settings. Temperature adjustment buttons allow precise control over your desired room temperature.

Fan speed controls offer options for varying airflow intensity, ranging from gentle breezes to powerful cooling. A timer button enables pre-set operation schedules for convenience and energy savings. The ‘Sleep’ mode gradually adjusts temperature for comfortable nighttime operation. Ensure the remote control has fresh batteries for optimal responsiveness. Point the remote directly at the air conditioner’s front panel for reliable communication.

Installation Guide

Proper installation is crucial for optimal performance. This section details preparing the exhaust hose, installing the window kit, and connecting components securely.

Preparing the Exhaust Hose

Before installation, carefully unpack the exhaust hose and inspect it for any damage incurred during shipping. Ensure the hose is fully extended and free from kinks or bends, as these can restrict airflow and reduce cooling efficiency. The exhaust hose is essential for venting hot air outside, preventing it from recirculating within the room.

Connect one end of the exhaust hose to the air conditioner’s exhaust outlet, typically located on the rear panel. Securely twist and lock the hose into place, ensuring a tight seal to prevent air leakage. The other end of the hose will connect to the window kit, which directs the hot air outdoors. Proper hose preparation and connection are vital for the unit’s effective operation and preventing potential issues like overheating or reduced cooling capacity.

Window Kit Installation

Begin by selecting a suitable window for installation, ensuring it can be securely closed around the window kit. Assemble the window kit components according to the included diagrams, adjusting the length of the kit panels to fit your window opening precisely. Insert the assembled kit into the window, creating a snug fit to minimize air leakage.

Secure the window kit using the provided screws or brackets, ensuring it’s firmly in place and won’t shift during operation. The window kit provides a sealed pathway for the exhaust hose, directing hot air outside. Proper installation is crucial for maximizing cooling efficiency and preventing warm air from re-entering the room. Double-check the seal around the kit for any gaps.

Connecting the Exhaust Hose to the Unit and Window Kit

First, securely attach one end of the exhaust hose to the designated port on the rear of the portable air conditioner. Ensure a tight connection, often requiring a clockwise twist-lock mechanism, to prevent air leakage. Next, connect the other end of the exhaust hose to the opening in the installed window kit. Again, confirm a secure fit, utilizing any provided clamps or fasteners.

Properly connecting the exhaust hose is vital for efficient operation; it expels hot air outside. Inspect the connections for any gaps or looseness, as these reduce cooling performance. A poorly connected hose allows warm air to recirculate, diminishing the unit’s effectiveness. Verify the hose isn’t kinked or obstructed.

Operating Instructions

Begin by powering on the unit and selecting your desired mode: cooling, dehumidification, or fan-only, utilizing the front panel controls or remote control.

Powering On and Initial Setup

Before initial use, ensure the unit is positioned on a level surface and the exhaust hose is properly connected, as detailed in the Installation Guide. Connect the power cord to a grounded outlet. Press the power button on the front panel or remote control to activate the air conditioner.

Upon powering on, the unit may perform a self-diagnostic check. Allow a few moments for the system to initialize. The display panel will illuminate, indicating the unit is ready for operation. It’s crucial to read the operation manual before using the device. Select your preferred operating mode – cooling, dehumidification, or fan – using the mode selection button.

For optimal performance, initially set the temperature to a comfortable level and adjust the fan speed as needed. Remember that dehumidification mode will generate heat, increasing room temperature. Familiarize yourself with the control panel and remote functions for efficient operation.

Cooling Mode Operation

To activate Cooling Mode, press the “Cool” button on the control panel or remote. Use the temperature adjustment buttons to select your desired room temperature. The unit will begin cooling the air and displaying the set temperature. Ensure the exhaust hose is correctly installed to vent hot air outside; improper installation reduces cooling efficiency.

The fan speed can be adjusted using the fan speed control buttons – options typically include low, medium, and high. Higher fan speeds provide faster cooling but may increase noise levels. Monitor the room temperature and adjust settings accordingly for optimal comfort.

Be mindful that a significant temperature drop may cause the unit to freeze. If this occurs, increase the set temperature to prevent ice formation. Regularly check the air filter for cleanliness to maintain cooling performance.

Dehumidification Mode Operation

To initiate Dehumidification Mode, press the designated “Dehumidify” button on either the unit’s control panel or the remote control. In this mode, the air conditioner extracts moisture from the room, reducing humidity levels. Note that dehumidification mode inherently increases room temperature as a byproduct of the process; this is normal operation.

Warm air will be expelled through the exhaust hose, even though the primary function is moisture removal. The unit generates heat during dehumidification, so expect a slight rise in room temperature. Regularly emptying the water tank is crucial for continuous operation; the unit will typically indicate when the tank is full.

Avoid setting excessively low temperatures while in dehumidification mode, as this can lead to unnecessary energy consumption and potential freezing.

Fan Mode Operation

Engage Fan Mode by pressing the “Fan” button on the control panel or remote. This mode circulates air within the room without providing cooling. It’s ideal for simply refreshing the air or complementing other heating/cooling sources. You can typically select from multiple fan speeds – Low, Medium, and High – to adjust the airflow intensity to your preference.

In Fan Mode, the compressor is deactivated, resulting in lower energy consumption compared to Cooling or Dehumidification modes. The exhaust hose is still required to be connected, allowing for proper air circulation. This mode is particularly useful for distributing heated air from a furnace or cooled air from central air conditioning.

Remember to select your desired fan speed for optimal comfort and air movement.

Advanced Features & Settings

Explore enhanced control! Adjust temperature, fan speeds, set timers, and activate Sleep Mode for personalized comfort and efficient operation of your Sharp unit.

Temperature Adjustment

Setting Your Desired Comfort Level: Your Sharp portable air conditioner allows precise temperature control to create the perfect indoor climate. Use the remote control or the front panel controls to adjust the target temperature. The temperature range is typically between 64°F (18°C) and 86°F (30°C), though this may vary slightly depending on the specific model;

Press the “Temp Up” or “Temp Down” buttons to increase or decrease the set temperature in 1°F (or 1°C) increments. The display will show the currently selected temperature. Remember that setting a significantly lower temperature than the room temperature won’t necessarily cool the room faster; it might even lead to the unit freezing. A moderate temperature setting is generally more efficient and prevents potential issues. Consider a gradual adjustment for optimal comfort and performance.

Fan Speed Control

Optimizing Airflow for Your Needs: Your Sharp portable air conditioner offers multiple fan speed settings to customize airflow and noise levels. Typically, you’ll find options like Low, Medium, and High, accessible via the remote control or the unit’s front panel. Selecting a lower fan speed minimizes noise and energy consumption, ideal for quiet environments or nighttime use.

Higher fan speeds provide more powerful airflow for faster cooling. The “Auto” fan speed setting automatically adjusts the fan based on the temperature difference between the set temperature and the room temperature. This provides a balance between comfort and energy efficiency. Experiment with different fan speeds to find the setting that best suits your preferences and the room’s cooling requirements. Remember, higher speeds consume more power.

Timer Function

Scheduling Operation for Convenience: The timer function allows you to pre-set the air conditioner to automatically turn on or off at a specified time. This feature enhances convenience and can contribute to energy savings. To set the timer, use the “Timer” button on the remote control or the control panel. You can typically set a delay before the unit turns off, or a time for it to automatically power on.

The timer settings usually range from 1 to 24 hours. Ensure the current time is correctly set for accurate scheduling. Utilizing the timer function means you can return to a cool room after work or ensure the unit doesn’t run unnecessarily overnight, reducing energy costs and maximizing comfort. Refer to the display for confirmation of your timer settings.

Sleep Mode

Enjoy Comfortable Sleep with Optimized Cooling: Sleep mode is designed to provide a comfortable sleeping environment by gradually increasing the room temperature during the night. This prevents overcooling and conserves energy. When activated, the air conditioner will slowly raise the set temperature by 1-2 degrees Celsius over several hours.

This gentle temperature adjustment mimics the natural body temperature decrease during sleep, promoting a more restful experience. To activate sleep mode, press the designated “Sleep” button on the remote control. The unit will automatically adjust its operation. Sleep mode typically also reduces fan speed for quieter operation. Deactivating sleep mode returns the unit to its previously set parameters.

Maintenance and Troubleshooting

Ensure Optimal Performance: Regular cleaning of the air filter and proper water drainage are crucial for maintaining efficiency and resolving common operational issues.

Cleaning the Air Filter

Maintaining clean air filters is essential for optimal performance and longevity of your Sharp portable air conditioner. A clogged filter restricts airflow, reducing cooling efficiency and potentially causing the unit to overheat. Regular cleaning, ideally every two weeks during periods of frequent use, is highly recommended.

To clean the filter, first power off and unplug the air conditioner. Locate the filter access panel – typically on the rear or side of the unit. Gently remove the air filter. Use a vacuum cleaner with a brush attachment to remove loose dust and debris. For a more thorough cleaning, wash the filter with mild detergent and lukewarm water.

Rinse thoroughly and allow the filter to air dry completely before reinstalling it. Never operate the air conditioner without the filter in place, as this can damage the unit. A clean filter ensures efficient cooling, improved air quality, and extends the lifespan of your Sharp portable air conditioner.

Draining Water (Dehumidification Mode)

When operating in dehumidification mode, your Sharp portable air conditioner collects moisture from the air, which accumulates in an internal tank. Regularly draining this tank is crucial to prevent overflow and ensure continued operation. The unit may have an indicator light or signal to alert you when the tank is full.

To drain the tank, power off and unplug the air conditioner. Locate the drain tank access – usually at the rear or bottom of the unit. Carefully remove the tank, being mindful of any remaining water. Empty the water into a suitable drain and thoroughly rinse the tank with clean water.

Ensure the tank is securely reinstalled before resuming operation. Some models may feature a continuous drain option, allowing connection to a drain hose for automatic water removal. Proper drainage prevents water damage and maintains the dehumidification performance of your Sharp portable air conditioner.

Troubleshooting Common Issues (Freezing, No Cooling)

If your Sharp air conditioner isn’t cooling effectively, or ice forms on the cooling coils, several factors could be at play. First, check the air filter – a clogged filter restricts airflow, causing freezing. Ensure the exhaust hose is properly connected and not kinked, as this hinders heat expulsion.

Low refrigerant levels can also cause insufficient cooling, requiring professional service. If the unit freezes, power it off and allow the ice to thaw completely before restarting, and increase the temperature setting. No cooling may also indicate a blocked exhaust vent or a malfunctioning compressor.

Consult the error codes displayed (if applicable) and refer to the full manual for specific solutions. If problems persist, contact a qualified technician for assistance.

Important Considerations

Remember, dehumidification mode generates heat, raising room temperature; warm air from the exhaust is normal. Prevent freezing by adjusting temperature settings accordingly.

Preventing Unit Freezing

To avoid ice formation on your Sharp portable air conditioner, several factors require attention. Operating the unit in excessively low ambient temperatures can contribute to freezing, as can setting the thermostat to a very low temperature. If the unit begins to freeze, immediately increase the thermostat setting.

Ensure proper ventilation; restricted airflow can also cause freezing. Regularly clean the air filter to maintain optimal airflow. In dehumidification mode, remember the unit naturally generates heat, but a further temperature drop can still induce freezing if the set temperature is too low. Monitoring the unit and adjusting settings proactively will ensure efficient and trouble-free operation, preventing ice buildup and maintaining cooling performance.

Understanding Heat Generation in Dehumidification Mode

Dehumidification operates differently than cooling. While removing moisture from the air, your Sharp portable air conditioner inherently generates heat as a byproduct of the condensation process. This means the room temperature will likely increase during dehumidification, even though the air feels less humid.

Warm air will be expelled through the exhaust outlet – this is perfectly normal and doesn’t indicate a malfunction. The unit isn’t designed to cool the room in this mode; its primary function is moisture removal. Understanding this heat generation prevents confusion and ensures you’re utilizing the dehumidification feature correctly for optimal comfort and a drier indoor environment. It’s a natural consequence of the physics involved in condensing water from air.

jerk off instructions written

Comprehensive sex education is vital for responsible behavior, encompassing medically accurate information and respect for self and others, as highlighted by recent guidelines.

Statutory guidance from the Department for Education emphasizes its importance within the education system, addressing crucial aspects of sexual health.

This holistic approach aims to empower individuals with knowledge, promoting safety and well-being, while navigating complex societal issues related to sexuality.

The Importance of Sex Education

Sex education is fundamentally important for equipping young people with the knowledge and skills to make informed decisions about their sexual health and relationships.

It moves beyond simply avoiding risky behaviors, fostering a culture of respect for oneself and others, as advocates emphasize, shifting the focus to safety and responsibility.

Comprehensive programs, guided by UN recommendations, address crucial topics like gender equality and safe sex practices, reducing teen pregnancy rates and improving overall sexual health outcomes.

Furthermore, it plays a vital role in preventing STIs and addressing sexual violence, creating a safer and more equitable society for all, as highlighted by recent DfE guidance.

Effective sex education empowers individuals to navigate complex issues with confidence and understanding.

Current Landscape of Sex Education (November 26, 2025)

As of November 26, 2025, the landscape of sex education is marked by both progress and significant political contention across various regions.

Michigan House Republicans are actively pushing back against proposed curriculum changes, particularly concerning instruction on sexual orientation and gender identity, reflecting ongoing debates.

Conversely, in Aotearoa, concerns are rising over the scrapping of the 2020 Relationship and Sex Education Guidelines, potentially hindering adolescent safety.

The Department for Education (DfE) continues to issue statutory guidance, while advocates navigate challenges from religious perspectives and proposed age restrictions on content.

This dynamic environment necessitates ongoing evaluation and adaptation of sex education programs to ensure inclusivity and effectiveness.

Key Components of Effective Sex Education

Effective sex education requires medically accurate, developmentally appropriate content focusing on behavioral skills, promoting responsible choices and respect for oneself and others.

Medically Accurate Information

Medically accurate information forms the bedrock of effective sex education, ensuring students receive evidence-based knowledge about anatomy, reproduction, and sexual health.

This includes comprehensive details on sexually transmitted infections (STIs), contraception, and safe sex practices, as emphasized in current guidelines.

Accuracy extends to discussions about gender identity and sexual orientation, fostering understanding and inclusivity.

Providing factual, unbiased information empowers young people to make informed decisions about their bodies and relationships, promoting responsible sexual behavior and overall well-being.

It’s crucial to dispel myths and address misinformation, creating a safe space for open and honest dialogue.

Developmentally Appropriate Content

Developmentally appropriate content is paramount in sex education, tailoring information to the cognitive and emotional maturity of students at each age level.

Younger children require simpler explanations focusing on body boundaries and healthy relationships, while adolescents benefit from more detailed discussions about puberty, consent, and contraception.

Curricula must evolve with students’ understanding, addressing complex topics like gender identity and sexual orientation with sensitivity and respect.

Proposed age limits and restrictions necessitate careful consideration, balancing parental concerns with the need for comprehensive education.

Effective instruction builds upon prior knowledge, fostering a safe and supportive learning environment.

Focus on Behavioral Skills

Effective sex education extends beyond knowledge transmission, prioritizing the development of crucial behavioral skills for navigating relationships and making responsible decisions;

This includes teaching communication, negotiation, and assertiveness techniques to promote healthy interactions and consent.

Emphasis on safe sex practices, like consistent condom use, is vital for preventing sexually transmitted infections (STIs) and unintended pregnancies.

Educating about respect for oneself and others fosters a culture of empathy and understanding.

Ultimately, the goal is to empower individuals to prioritize their sexual health and well-being.

Navigating Controversies in Sex Education

Sex education often faces pushback due to parental concerns, political agendas, and religious perspectives, leading to curriculum changes and heated debates nationwide.

Parental Concerns and Involvement

Parental involvement in sex education is a significant source of controversy, with concerns often centering around the age-appropriateness of content and alignment with family values.

Many parents desire greater transparency and the right to review curriculum materials, fearing exposure to topics they believe their children are not ready for.

Advocates emphasize open communication between parents and children, alongside school-based education, to foster healthy discussions about sexuality.

Conversely, some parents actively oppose certain aspects of sex education, particularly those addressing sexual orientation or gender identity, leading to political activism and curriculum challenges.

Finding a balance between parental rights and the need for comprehensive, medically accurate education remains a key challenge.

Political Pushback and Curriculum Changes

Political opposition to comprehensive sex education is escalating, evidenced by legislative efforts to restrict curriculum content and parental involvement policies.

In Michigan, House Republicans are actively pushing back against proposed instruction on sexual orientation and gender identity, signaling a broader trend of conservative resistance.

These challenges often stem from ideological disagreements regarding the scope and nature of sex education, with debates focusing on age-appropriateness and parental rights.

Curriculum changes are frequently proposed, aiming to remove or modify content deemed controversial, impacting the availability of medically accurate information.

Such political pressures create instability and hinder efforts to provide students with comprehensive sexual health education.

Religious Perspectives on Sex Education

Religious viewpoints significantly influence the debate surrounding sex education, with diverse interpretations impacting curriculum acceptance and implementation.

Advocates for traditional values, like those within the Catholic Church, express concerns about comprehensive sex education potentially conflicting with religious teachings on marriage and family.

These perspectives often prioritize abstinence and emphasize the sacredness of procreation within marriage, leading to opposition against discussions of contraception or diverse sexual orientations.

Conversely, some religious groups support inclusive sex education, believing it promotes respect, responsibility, and healthy relationships aligned with their values.

Navigating these differing beliefs requires sensitivity and a commitment to respectful dialogue when shaping sex education policies.

Specific Topics within Sex Education

Essential topics include safe sex practices, gender relations, sexual orientation, and respect for self and others, fostering responsible behavior and healthy relationships.

Education about gender equality, as per UN guidance, is crucial for navigating adolescence safely and responsibly.

These areas promote understanding and empower individuals to make informed decisions about their sexual health and well-being.

Safe Sex Practices and Condom Use

Prioritizing safety involves understanding and implementing effective practices, including consistent and correct condom use during sexual intercourse, as emphasized by current guidelines.

Thinking twice before engaging with a new partner is a foundational step, alongside open communication about sexual health history and boundaries.

Comprehensive sex education shifts the focus from abstinence-only approaches to promoting responsible sexual behavior, emphasizing “do it safely and responsibly” when ready.

Educating about safe sex ultimately means teaching respect for oneself and others, empowering individuals to protect their physical and emotional well-being.

These practices are vital for preventing sexually transmitted infections (STIs) and promoting overall sexual health.

Gender Relations and Equality

Understanding gender relations is a key component of comprehensive sex education, advocating for equality and respect in all interactions, as per UN recommendations.

International guidance stresses the importance of teaching young people about gender equality, challenging harmful stereotypes and promoting healthy relationships.

This includes fostering an environment where individuals feel safe to express themselves authentically, regardless of gender identity or expression.

Effective sex education addresses power dynamics and consent, ensuring all parties involved feel empowered and respected.

Promoting equality contributes to a more inclusive and equitable society, fostering positive gender relations for all.

Sexual Orientation and Gender Identity

Inclusive sex education must address sexual orientation and gender identity, fostering understanding and acceptance among students, as highlighted in recent curriculum discussions.

Michigan House Republicans are currently debating proposed instruction on these topics, emphasizing the need for sensitive and age-appropriate content.

Comprehensive programs aim to create a safe space for LGBTQ+ youth, promoting self-esteem and reducing stigma.

Educating students about diverse identities contributes to a more inclusive school environment and broader society.

This includes addressing discrimination and promoting respect for all individuals, regardless of their sexual orientation or gender identity.

Respect for Self and Others

Central to effective sex education is cultivating respect for oneself and others, shifting the focus from abstinence-only approaches to responsible decision-making.

Educating about safe sex inherently involves teaching boundaries, consent, and healthy relationship dynamics, as emphasized by advocates for comprehensive programs.

This includes promoting empathy, communication skills, and an understanding of diverse perspectives on sexuality.

Respectful interactions are foundational for preventing sexual violence and abuse, fostering a culture of safety and accountability.

Ultimately, sex education should empower individuals to navigate relationships with integrity and prioritize their well-being and the well-being of others.

Age-Appropriate Instruction

Developmentally appropriate content is crucial, with proposed age limits impacting what is taught; younger children receive basic safety, while adolescents explore complex topics.

Guidance stresses tailoring information to cognitive and emotional maturity, ensuring understanding and relevance for each age group.

This approach supports healthy development and responsible decision-making.

Sex Education for Younger Children

Early education focuses on personal safety, body boundaries, and respectful relationships, laying a foundation for future understanding. Discussions center on appropriate touch, recognizing uncomfortable feelings, and seeking help from trusted adults.

This age group benefits from simple, direct language, avoiding complex biological details. The emphasis is on building self-esteem and empowering children to communicate their needs effectively.

Current guidelines, like those from the Department for Education, support teaching children about their bodies in a safe and age-appropriate manner, fostering a positive self-image and promoting healthy development; It’s about establishing a base of knowledge and trust.

Sex Education for Adolescents

Adolescent sex education expands on foundational concepts, incorporating medically accurate information about puberty, reproduction, and sexually transmitted infections (STIs). Discussions include safe sex practices, like consistent condom use, and responsible decision-making regarding sexual activity.

This stage addresses gender relations, equality, and respect for diverse sexual orientations and gender identities, aligning with UN recommendations. It’s crucial to promote healthy communication and consent within relationships.

Navigating potential political pushback and parental concerns requires sensitivity and adherence to evidence-based curricula, ensuring adolescents receive comprehensive and unbiased information for informed choices.

Proposed Age Limits and Restrictions

Recent proposals suggest restricting sex education content for children under 13, focusing on delaying explicit topics and potentially limiting discussions on sexual orientation and gender identity. These restrictions spark debate, with advocates fearing hindered adolescent development and safe navigation of sexuality.

Concerns arise regarding access to medically accurate information and the potential for increased risky behaviors due to lack of comprehensive education. Religious perspectives often fuel these debates, influencing curriculum changes and parental involvement.

Balancing parental rights with the need for age-appropriate, inclusive education remains a significant challenge, requiring careful consideration of public health outcomes and adolescent well-being.

International Guidelines and Standards

UN recommendations prioritize teaching gender relations and equality, while RSE guidelines aim to equip young people with knowledge for safe adolescent navigation.

These standards emphasize comprehensive sexuality education, promoting responsible behavior and respect for diverse identities globally.

Pacific scholars advocate maintaining RSE guidelines to ensure rangatahi safety.

UN Recommendations on Sexuality Education

The United Nations advocates for a comprehensive approach to sexuality education, emphasizing rights-based and life-skills education. Based on international guidance from May 2023, curricula should address gender relations and equality, fostering respectful interactions.

These recommendations extend beyond biological aspects, encompassing emotional, social, and ethical dimensions of sexuality. The UN stresses the importance of medically accurate information, delivered in a developmentally appropriate manner.

Furthermore, the guidelines promote inclusivity, acknowledging diverse sexual orientations and gender identities. This holistic framework aims to empower young people to make informed decisions about their sexual health and well-being, contributing to a more equitable and just society.

Relationship and Sex Education (RSE) Guidelines

Relationship and Sex Education (RSE) guidelines, like those from 2020 in Aotearoa, are facing scrutiny, with concerns raised about potential scrapping impacting adolescent safety. These guidelines aim to equip young people with the knowledge and skills to navigate relationships and sexuality responsibly.

Statutory guidance from the Department for Education (DfE) in the UK underscores the need for medically accurate and developmentally appropriate content. A quality curriculum focuses on key behavioral skills, promoting responsible choices.

Advocates emphasize that robust RSE is crucial for preventing harm and fostering healthy attitudes towards sex and relationships, ensuring young people are well-prepared for the complexities of life.

The Role of Education in Sexual Health

Education promotes responsible sexual behavior, preventing STIs and addressing abuse, emphasizing respect for self and others – a shift towards safety and responsibility.

Comprehensive curricula include medically accurate content, fostering informed decision-making and positive sexual health outcomes for all individuals.

Promoting Responsible Sexual Behavior

Responsible sexual behavior extends beyond abstinence, encompassing informed choices about intimacy and relationships, grounded in respect and consent. Education plays a pivotal role in shifting the narrative from simply discouraging sexual activity to equipping individuals with the knowledge to navigate it safely and responsibly.

This includes understanding personal boundaries, recognizing healthy relationship dynamics, and practicing safe sex, utilizing tools like condoms to prevent STIs.

Furthermore, it necessitates open communication about desires and expectations, fostering a culture where individuals feel empowered to prioritize their sexual health and well-being, as emphasized by current guidelines.

Preventing Sexually Transmitted Infections (STIs)

Preventing STIs is a cornerstone of comprehensive sexual health education, requiring medically accurate information about transmission, symptoms, and available testing and treatment options. Emphasis should be placed on consistent and correct condom use as a primary preventative measure, alongside open communication about sexual health status with partners.

Education must also address the importance of regular STI screenings, particularly for sexually active individuals, and dispel common myths surrounding these infections.

Promoting responsible sexual behavior, as outlined in Department for Education guidance, directly contributes to reducing STI rates and safeguarding public health.

Addressing Sexual Violence and Abuse

Comprehensive sex education must directly address the critical issue of sexual violence and abuse, fostering a culture of respect, consent, and healthy boundaries. This includes defining different forms of abuse – physical, emotional, and sexual – and recognizing warning signs in relationships.

Education should empower individuals to identify and report abuse, providing information about available support services and legal protections.

Promoting respectful relationships, as emphasized in international guidelines, is fundamental to preventing sexual violence and creating safer communities for all.

Impact of Sex Education on Public Health

Effective sex education correlates with reduced teen pregnancy rates and improved sexual health outcomes, fostering responsible behavior and preventing STIs, as demonstrated by studies.

Reduced Teen Pregnancy Rates

Comprehensive sex education demonstrably contributes to a decline in teen pregnancy rates by equipping young people with knowledge about contraception and responsible sexual decision-making.

Providing medically accurate information empowers adolescents to delay sexual activity and utilize protective measures when they do become sexually active, leading to fewer unintended pregnancies.

Furthermore, programs emphasizing communication skills and healthy relationships foster a culture of respect and consent, reducing risky behaviors. The Department for Education’s guidance supports this, recognizing the link between education and positive outcomes.

Ultimately, investing in robust sex education is a proactive public health strategy with significant societal benefits.

Improved Sexual Health Outcomes

Comprehensive sex education significantly improves sexual health outcomes by fostering awareness of sexually transmitted infections (STIs) and promoting safe sex practices, including consistent condom use.

Medically accurate instruction empowers individuals to recognize STI symptoms, seek timely testing and treatment, and reduce transmission rates, contributing to overall public health.

Furthermore, education on consent, healthy relationships, and respect for oneself and others cultivates a positive sexual culture. The DfE guidance reinforces the importance of addressing these topics.

This proactive approach leads to reduced STI prevalence and improved well-being for individuals and communities.

Resources for Sex Education

Valuable resources include Department for Education (DfE) guidance and advocacy groups, offering support and medically accurate information for comprehensive sex education programs.

These organizations provide tools for educators and parents to navigate sensitive topics effectively.

Accessing these resources ensures quality instruction and promotes positive sexual health outcomes.

Department for Education (DfE) Guidance

The Department for Education (DfE) provides statutory guidance under the Education Act 2002 and 1996, outlining requirements for Relationship and Sex Education (RSE). This guidance, issued in July 2025, emphasizes medically accurate and developmentally appropriate content.

It stresses the importance of equipping students with knowledge about safe sex practices, including condom use, and fostering respect for themselves and others.

The DfE guidance aims to support schools in delivering effective RSE programs that address sensitive topics responsibly, while acknowledging parental concerns and navigating potential political pushback.

Furthermore, it encourages a focus on behavioral skills, promoting responsible decision-making and safeguarding student well-being.

Advocacy Groups and Organizations

Numerous advocacy groups actively champion comprehensive sex education, providing resources and support to schools and communities. These organizations advocate for medically accurate, inclusive curricula that address diverse sexual orientations and gender identities.

They work to counter political pushback and promote parental involvement, emphasizing the importance of equipping young people with the knowledge to make informed decisions.

These groups often offer training for educators and resources for parents, aligning with UN recommendations and RSE guidelines to ensure quality sexual health education.

Their efforts are crucial in navigating controversies and fostering a supportive environment for open dialogue about sexuality.

foodoloy instructions

Welcome to the world of Foodology Instructions, your comprehensive guide to culinary mastery․ Discover the art of cooking with expert-backed recipes, essential techniques, and safety tips․ Perfect for all skill levels, this guide ensures a delightful and educational journey, blending nutrition, flavor, and wellness for a transformative cooking experience․ Start your Foodology adventure today and unlock the secrets of delicious, healthy, and innovative cooking!

What is Foodology?

Foodology is a comprehensive approach to cooking and nutrition that combines culinary arts, science, and health․ It emphasizes understanding how ingredients work, their nutritional benefits, and how to prepare them optimally․ Originating from Korea, Foodology has gained global recognition as a K-Diet phenomenon, focusing on balanced, effective, and safe weight management․ Certified by the Ministry of Food and Drug Safety (MFDS), Foodology products, such as Coleology Tea and Cutting Jelly, are designed to aid digestion, reduce appetite, and boost metabolism․ This innovative approach integrates expert-backed recipes, essential techniques, and wellness principles, making it a holistic guide for transforming your relationship with food and cooking;

The Importance of Foodology in Modern Cooking

Foodology plays a vital role in modern cooking by blending nutrition, health, and culinary innovation․ It offers a structured approach to cooking, emphasizing balanced diets, safe weight management, and digestive health․ With certified products like Coleology Tea and Cutting Jelly, Foodology provides scientifically-backed solutions for contemporary dietary needs․ Its focus on natural ingredients and expert formulations makes it a trusted choice for those seeking effective yet healthy lifestyle changes․ By integrating kitchen essentials, step-by-step guides, and wellness tips, Foodology empowers home cooks to create nourishing meals․ Its adaptability to diverse cuisines and dietary preferences ensures it remains a cornerstone of modern cooking, fostering a culture of mindful eating and culinary excellence․

Brief History and Evolution of Foodology

Foodology traces its roots to Korea, where it emerged as a innovative approach to nutrition and cooking․ Developed by pharmacists, it gained prominence as a certified K-Diet brand under the Ministry of Food and Drug Safety․ Initially focused on weight management, Foodology evolved to encompass holistic wellness, blending culinary art with science․ Its popularity grew globally, driven by products like Coleology Tea and Cutting Jelly, which combine natural ingredients for effective results․ Over time, Foodology expanded its scope, offering comprehensive guides for home cooks and professionals alike․ Today, it stands as a testament to how traditional pharmacological knowledge merged with modern culinary practices to create a sustainable, health-focused movement in cooking and lifestyle․

Key Components of Foodology Instructions

Foodology Instructions emphasize essential kitchen tools, fundamental ingredients, and basic cooking techniques․ These components ensure mastery of culinary skills, promoting efficiency and creativity in the kitchen for all levels․

Understanding Basic Cooking Techniques

Mastering basic cooking techniques is the foundation of Foodology․ Essential methods include roasting, sautéing, boiling, and baking․ These techniques ensure consistency and elevate dishes to new heights․ Proper knife skills and understanding heat control are crucial․ Learning to cook proteins, vegetables, and grains effectively ensures balanced meals․ Familiarizing yourself with these techniques builds confidence and versatility in the kitchen, allowing for endless creativity and experimentation․ Start with simple methods like steaming or stir-frying, then progress to more advanced skills․ Practice and patience are key to refining your craft and achieving culinary excellence․

Essential Kitchen Tools for Foodology

A well-equipped kitchen is vital for mastering Foodology․ Start with basics like a chef’s knife, cutting board, and versatile cookware such as a skillet and Dutch oven․ Measuring tools, including cups and spoons, ensure accuracy in recipes; A food processor or immersion blender can streamline tasks like chopping and blending․ Don’t overlook kitchen scales for precise measurements, crucial for both cooking and baking․ Additional essentials include a timer, tongs, and spatulas for efficient cooking․ Organizational tools like spice racks and drawer organizers keep your workspace tidy․ Investing in quality tools enhances efficiency and creativity, making the cooking process enjoyable and effective․ These tools are the backbone of your Foodology journey, helping you execute techniques and recipes with confidence and precision․

Fundamental Ingredients in Foodology Recipes

Foodology recipes often rely on a core set of ingredients that balance nutrition, flavor, and functionality․ Key components include Green Tea Extract, known for its fat-burning properties, and Rhodiola, which boosts energy and mental clarity․ Garcinia Cambogia is frequently used to suppress appetite and aid in weight management․ Additionally, Camellia Sinensis Leaf Extract (green tea) and Coleus Forskohlii are staples for metabolism support and fat reduction․ These ingredients are often combined with nutrient-dense vegetables and essential vitamins to create holistic, health-focused dishes․ The emphasis is on natural, scientifically-backed components that align with dietary goals and overall wellness․ By incorporating these fundamentals, Foodology recipes cater to diverse needs, from weight loss to improved digestion, ensuring meals are both nourishing and delicious․

Step-by-Step Foodology Instructions

Master Foodology with simple steps: take 2 tablets daily with water, use Garcinia Cambogia jelly post-meal, and stay hydrated․ Follow dosing guidelines for optimal results and safety․

Preparing Ingredients: Tips and Tricks

Preparing ingredients is the foundation of successful Foodology․ Start by measuring ingredients accurately to ensure balanced flavors․ Chop vegetables uniformly for even cooking and texture․ Select fresh, seasonal produce to maximize flavor and nutrition․ For leafy greens, wash and dry thoroughly before use․ When working with herbs, bruise or chiffonade for optimal aroma․ Marinate meats or fish in advance to enhance tenderness and flavor․ Organize your mise en place to streamline the cooking process․ For baking, ensure all ingredients are at room temperature․ Don’t forget to chill ingredients like butter or eggs for pastry dough․ Finally, taste and adjust seasoning as you go․ These simple steps will elevate your dishes and make cooking more efficient․ Happy prepping!

Mastering Cooking Methods: From Basics to Advanced

Mastering various cooking methods is essential for versatile and delicious outcomes․ Start with foundational techniques like roasting, sautéing, and boiling, ensuring even cooking and retention of flavors․ Grilling and pan-frying add caramelized crusts, enhancing texture and taste․ Advanced methods include sous vide for precision temperature control or molecular gastronomy for creative presentations․ Practice heat control to avoid overcooking, especially for delicate proteins and vegetables․ Experiment with steaming for health-conscious meals or braising for tender, flavorful dishes․ Each method offers unique benefits, so understanding their applications will elevate your culinary skills․ Whether cooking for comfort or innovation, mastering these techniques will broaden your repertoire and inspire confidence in the kitchen․ Keep experimenting and refining your skills to become a versatile cook!

Meal Planning and Organization

Meal planning and organization are crucial for efficient and enjoyable cooking․ Start by creating a weekly schedule, listing all meals and ingredients needed․ Use digital tools or a planner to stay organized and ensure variety in your diet․ Stock your pantry with essentials to avoid last-minute shopping․ Pre-measured ingredients and prepped components can save time during cooking․ Implement a “first in, first out” rule for your groceries to minimize waste․ Organize your kitchen tools and spices for easy access․ Regularly review and adjust your meal plans to suit preferences and dietary needs․ Proper planning not only streamlines the cooking process but also helps maintain a balanced and nutritious diet․ With effective meal planning, you can reduce food waste, save time, and enjoy a more organized culinary experience․

Advanced Foodology Techniques

Elevate your culinary skills with advanced Foodology techniques, exploring global cuisines, innovating recipes, and mastering flavor-texture pairings․ These methods empower you to create sophisticated, memorable dishes with ease and creativity․

Exploring Global Cuisines

Embark on a culinary journey with Foodology by exploring global cuisines, from Korean K-Diet to Mediterranean and beyond․ Discover how traditional flavors and ingredients blend with modern techniques to create unique dishes․ With Foodology, you can master the art of adapting international recipes to your dietary needs while maintaining authenticity and taste․ Learn about the role of ingredients like green tea extract and Garcinia Cambogia, commonly used in Korean weight management products, and how they can be incorporated into global recipes․ This section will inspire you to experiment with diverse cooking styles, fostering creativity and cultural appreciation in your kitchen․ By exploring global cuisines, you’ll broaden your culinary horizons and develop a deeper understanding of how flavors and techniques can be harmoniously combined․

Innovating Recipes with Foodology Principles

Innovate your recipes with Foodology principles by blending traditional flavors with modern twists․ Learn how to creatively incorporate ingredients like green tea extract, Garcinia Cambogia, and other natural elements into your dishes․ Discover how to reduce carbs and enhance flavors while maintaining nutritional balance․ For example, substitute traditional sugars with plant-based sweeteners or experiment with texture by adding pomegranate-flavored jellies․ These innovations not only diversify your culinary repertoire but also cater to health-conscious dietary preferences․ By applying Foodology’s core principles, you can transform classic recipes into healthier, tastier versions that delight both the palate and the body․ This approach encourages experimentation, ensuring your dishes remain fresh, exciting, and aligned with your wellness goals․

Pairing Flavors and Textures

Picking the right flavor and texture combinations is key to making great dishes․ Foodology teaches you how to mix tastes like sweet, sour, salty, and umami․ For example, sweet and tangy flavors can make your food more interesting․ Crunchy textures, like those from fresh veggies, can add contrast to soft elements like cooked grains․ Foodology also suggests using natural ingredients like green tea extract and Garcinia Cambogia to add unique flavors․ These tips can help you create balanced and tasty meals that are both healthy and enjoyable․ Try pairing flavors and textures in new ways to make your cooking stand out!

Health and Safety in Foodology

Ensuring safety and nutrition is vital in Foodology․ Follow proper food handling guidelines, maintain nutritional balance, and manage allergies․ Use natural ingredients like green tea extract safely for optimal health benefits․

Food Safety Guidelines

Food safety is a cornerstone of Foodology, ensuring meals are prepared and consumed safely․ Always check expiration dates and follow recommended serving sizes․ Avoid consuming products during pregnancy or breastfeeding unless advised․ Proper food handling, like separating raw and cooked ingredients, is essential to prevent contamination․ Store supplements and ingredients in their original packaging and cool, dry places․ Consume products as directed, and never exceed the recommended dosage․ For optimal digestion, consider having a light meal or water before taking supplements․ Cleanliness in the kitchen is vital, so wash hands and utensils regularly․ These guidelines help maintain health and effectiveness while enjoying Foodology recipes and products․

Nutritional Balance in Foodology Recipes

Nutritional balance is a key principle in Foodology, ensuring recipes provide essential nutrients for overall well-being․ Foodology emphasizes the use of nutrient-dense ingredients like green tea extract, Garcinia Cambogia, and vitamins to support metabolism and energy․ These ingredients are carefully selected to aid in fat burning and weight management while maintaining dietary balance․ The programs often include expert-backed recipes that combine proteins, carbohydrates, and healthy fats to create meals that are both nourishing and delicious․ By focusing on natural and effective components, Foodology helps individuals achieve their health goals without compromising on flavor․ This approach ensures that every dish supports long-term wellness and vitality, making it easier to maintain a healthy lifestyle․

Allergies and Dietary Restrictions

Foodology places a strong emphasis on addressing allergies and dietary restrictions, ensuring recipes are adaptable to various needs․ Many Foodology products, such as Coleology Cutting Jelly and teas, are plant-based and free from common allergens, making them suitable for diverse dietary preferences․ The program encourages label reading and ingredient awareness to help users make informed choices․ Certified by the Ministry of Food and Drug Safety, these products are designed with safety in mind․ For those with specific restrictions, Foodology offers customizable meal plans and ingredient substitutions, ensuring everyone can enjoy balanced and nutritious meals․ By prioritizing natural, gentle ingredients, Foodology helps individuals with sensitivities or dietary constraints achieve their health goals without compromising on flavor or nutrition․

Foodology for Beginners

Welcome to Foodology! This section provides guidance for newcomers, offering simple recipes, essential techniques, and confidence-building tips․ Perfect for those starting their culinary journey, ensuring a smooth transition into the world of Foodology․

Simple Recipes to Start Your Foodology Journey

Embark on your Foodology adventure with easy-to-follow recipes designed for beginners․ Start with simple dishes like one-pan meals, stir-fries, or omelets, which require minimal ingredients and time․ These recipes focus on foundational techniques such as sautéing, boiling, and seasoning․ Use fresh, accessible ingredients to create nutritious and flavorful meals․ For example, a classic vegetable stir-fry can be made in under 30 minutes, teaching you how to balance flavors and textures․ Similarly, a hearty lentil soup introduces you to slow cooking and layering spices․ These recipes are perfect for building confidence in the kitchen while mastering basic Foodology principles․ Follow step-by-step guides to ensure success and gradually experiment with new ingredients as you grow more comfortable․ Let these simple recipes lay the groundwork for your culinary exploration and creativity․

Common Mistakes to Avoid

When starting your Foodology journey, it’s essential to steer clear of common pitfalls that can hinder your progress․ One major mistake is not following measurements accurately, which can disrupt the balance of flavors and textures․ Overcomplicating recipes early on can also lead to frustration, so stick to simple, step-by-step instructions․ Neglecting to taste and adjust seasoning as you cook is another error, as it often results in underseasoned or overly salty dishes․ Additionally, overcrowding pans can prevent proper browning and even cooking, so cook in batches if necessary․ Lastly, avoid skipping foundational techniques like proper knife skills or mise en place, as these are crucial for efficiency and success in the kitchen․ By being mindful of these mistakes, you’ll set yourself up for a smoother and more enjoyable cooking experience․

Building Confidence in the Kitchen

Building confidence in the kitchen is a journey that starts with small, achievable steps․ Begin by mastering simple recipes and gradually experiment with new ingredients and techniques․ Practice is key—repetition helps develop muscle memory and familiarity with cooking processes․ Don’t be afraid to make mistakes; they are valuable learning opportunities․ Invest in quality kitchen tools, as they can make tasks easier and more enjoyable․ Watching tutorials or following step-by-step guides can also boost your skills and understanding․ Celebrate your successes, no matter how small, to stay motivated․ Remember, confidence grows with consistency, so keep cooking and exploring new recipes․ Over time, you’ll feel more comfortable and creative in the kitchen, unlocking a world of culinary possibilities․

Foodology and Technology

Explore how technology transforms cooking with smart gadgets, meal planning apps, and social media inspiration․ These tools enhance efficiency, creativity, and accessibility, streamlining your culinary process and making Foodology more dynamic and enjoyable․

Using Kitchen Gadgets for Efficient Cooking

Modern kitchen gadgets have revolutionized the way we cook, making Foodology instructions more accessible and efficient․ Tools like slow cookers, food processors, and smart thermometers simplify meal preparation and ensure precise results․ For instance, programmable slow cookers allow for hands-off cooking, perfect for busy schedules, while advanced blenders and grinders streamline ingredient preparation․ Smart kitchen scales and thermometers help maintain accuracy, essential for mastering Foodology techniques․ Additionally, gadgets like air fryers and sous vide machines enable healthier and more controlled cooking methods․ These innovations not only save time but also enhance the overall cooking experience, making it easier to follow Foodology instructions and achieve professional-grade dishes at home․ By incorporating these gadgets, home cooks can elevate their culinary skills and explore new recipes with confidence․

Digital Tools for Meal Planning and Organization

Digital tools have transformed meal planning and organization, making Foodology instructions easier to follow․ Apps like meal planners and grocery list generators help users organize recipes, track ingredients, and schedule meals․ Platforms such as recipe management software allow for easy access to step-by-step guides and nutritional information․ Barcode scanners and pantry management apps ensure you never run out of essentials․ Smart kitchen devices integrate with these tools, enabling voice commands and hands-free cooking․ Digital calendars and reminders help maintain consistency in meal prep, while shared cooking platforms foster collaboration․ These tools streamline the cooking process, reduce waste, and enhance creativity․ By leveraging technology, home cooks can efficiently plan, organize, and execute Foodology recipes, ensuring a seamless and enjoyable culinary experience․

The Role of Social Media in Foodology

Social media has become a powerful platform for sharing and discovering Foodology instructions․ Platforms like Instagram, YouTube, and Pinterest showcase vibrant visuals of recipes, step-by-step tutorials, and cooking challenges․ Influencers and chefs share their culinary expertise, inspiring home cooks to experiment with new techniques․ Hashtags like #Foodology and #Kdiet connect a global community, fostering collaboration and idea exchange․ Users can follow Foodology brands for updates, tips, and product reviews․ Social media also serves as a marketplace for food-related products, with direct links to purchase ingredients and tools․ Additionally, it provides a space for feedback and support, helping users refine their cooking skills․ By leveraging social media, Foodology enthusiasts can stay informed, inspired, and connected, making it an indispensable resource for culinary growth and exploration․ This digital interaction enhances the learning process and encourages creativity in the kitchen․ Discover, share, and elevate your Foodology journey with just a click!

Congratulations on completing your Foodology journey! Apply these insights to elevate your cooking and embrace a healthier, more flavorful lifestyle․ Happy cooking!

The Future of Foodology

The future of Foodology lies in innovation and accessibility․ With advancements in technology, cooking is becoming more efficient and personalized․ Smart kitchens, AI-driven meal planning, and sustainable practices are reshaping how we cook․ The rise of global cuisines and health-focused diets will continue to inspire new recipes; Foodology will also emphasize eco-friendly cooking methods and waste reduction․ As more people embrace home cooking, educational resources and digital tools will play a key role in making culinary skills accessible to everyone․ The integration of nutrition science and flavor innovation will ensure that Foodology remains a cornerstone of modern cooking, fostering creativity and wellness for years to come․

Final Tips for Mastering Foodology Instructions

Mastering Foodology instructions requires practice, creativity, and attention to detail․ Start by experimenting with simple recipes and gradually incorporate advanced techniques․ Don’t be afraid to fail—it’s a crucial part of the learning process․ Stay organized by meal planning and prepping ingredients ahead of time․ Invest in quality kitchen tools and familiarize yourself with their uses․ Embrace global flavors and seasonal ingredients to keep your dishes fresh and exciting․ Finally, always follow safety guidelines and maintain a clean kitchen environment․ By combining these tips with patience and enthusiasm, you’ll become a confident and skilled cook, ready to tackle any Foodology challenge․ Remember, the key to success lies in consistency and a willingness to learn and adapt․

sharp portable air conditioner instruction manual

Welcome to the Sharp Portable Air Conditioner Instruction Manual. This guide provides essential information for safe, efficient, and proper use of your portable air conditioner.

Designed to help you understand features, operation modes, and maintenance, this manual ensures optimal performance and comfort. Read carefully for troubleshooting and setup instructions.

Overview of the Manual

This manual provides comprehensive guidance for installing, operating, and maintaining your Sharp portable air conditioner. It covers safety precautions, device description, operation modes, remote control setup, temperature control, and maintenance tips. Troubleshooting and technical specifications are also included to ensure optimal performance and user convenience throughout the year.

Importance of Reading the Manual

Reading this manual ensures safe and efficient operation of your Sharp portable air conditioner. It helps prevent installation errors, optimizes performance, and prolongs the unit’s lifespan. Understanding the guidelines enables you to troubleshoot issues and utilize all features effectively, ensuring a comfortable and reliable cooling experience throughout the year.

Installation and Setup

Proper installation ensures optimal performance and safety. Choose a suitable location, ensure correct venting, and connect the unit to a suitable power supply as outlined in the manual.

Choosing the Right Location for the Unit

Select a location with good airflow, away from direct sunlight and obstructions. Ensure the unit is placed on a level surface and near a window for proper venting. Avoid areas prone to moisture or extreme temperatures for optimal performance and efficiency.

Proper Venting and Drainage Setup

Ensure proper venting by using the provided kit with a window adapter to expel hot air outside. Keep the unit upright during operation to prevent water leakage. Regularly check for condensed water accumulation and direct it away from the unit for efficient operation. Some models feature a self-evaporation system, reducing drainage needs.

Connecting the Unit to Power Supply

Connect the portable air conditioner to a grounded electrical outlet with the correct voltage rating. Use the provided power cord to ensure safe operation. Avoid using extension cords to prevent power issues. Ensure the circuit can handle the unit’s power requirements for reliable performance and safety.

Safety Precautions

Ensure the unit is properly grounded. Avoid improper voltage connections. Keep water away from electrical components. Never ground the unit to gas pipes for safety.

Grounding the Air Conditioner

Proper grounding is essential for safety. Connect the air conditioner to a grounded electrical outlet. Never use gas pipes for grounding. Ensure all connections are secure to prevent electrical hazards and ensure safe operation.

Avoiding Improper Voltage Connections

Always use the recommended voltage and frequency to prevent damage. Never connect the air conditioner to an incorrect power supply. Use a grounded outlet to ensure safety and proper function. Improper connections can cause malfunctions or safety hazards. Refer to the manual for specific voltage requirements and guidelines.

Preventing Gas Pipe Grounding

Never ground the air conditioner to gas pipes, as this can create safety hazards. Use a dedicated grounding point to ensure proper electrical safety. Improper grounding may lead to dangerous conditions. Always follow the manual’s instructions for correct grounding procedures to avoid potential risks and ensure safe operation of the unit.

Device Description

The Sharp Portable Air Conditioner is designed for cooling, dehumidifying, and ventilating domestic spaces. It features a compact, portable design with key components and advanced technologies like Plasmacluster for improved air quality and mobility.

Key Components and Features

The Sharp Portable Air Conditioner features a sleek design with essential components like a high-efficiency compressor, evaporative water system, and advanced Plasmacluster technology for improved air quality. It includes a remote control, multiple fan speeds, and a built-in handle for easy mobility, ensuring year-round comfort and convenience.

Understanding the Control Panel

The control panel offers intuitive buttons for temperature adjustment, fan speed selection, and mode switching. Features include LED display for clear settings, timer, and error code indicators. The remote complements the panel, providing convenience to control functions without physical access to the unit, ensuring seamless operation and user-friendly experience.

Portable Design and Mobility Features

The Sharp portable air conditioner features a compact, lightweight design with built-in handles and wheels for easy mobility. This allows seamless relocation between rooms without disassembling the unit, ensuring versatile cooling solutions for different spaces while maintaining efficiency and performance.

Operation Modes

Explore versatile operation modes: cooling, dehumidifying, and ventilating. These modes ensure optimal comfort, humidity control, and fresh air circulation, catering to diverse environmental needs throughout the year.

Cooling, Dehumidifying, and Ventilating Modes

The Sharp portable air conditioner offers three primary operation modes: cooling to reduce room temperature, dehumidifying to remove excess moisture, and ventilating to circulate fresh air. Each mode is designed to enhance comfort and air quality, ensuring a pleasant indoor environment year-round.

Heating Function for Year-Round Comfort

The Sharp portable air conditioner features a heating function, providing year-round comfort by reversing the refrigeration process to supply warm air during colder months. This feature ensures a consistent indoor climate, allowing you to enjoy a comfortable environment throughout the year with efficient heating performance.

Fan Speed Settings (High/Medium/Low)

The Sharp portable air conditioner offers three fan speed settings—High, Medium, and Low—allowing you to customize airflow according to your needs. Adjust the fan speed using the remote control or control panel to achieve optimal comfort and energy efficiency in your space.

Remote Control Setup and Usage

Set up your remote control easily using automatic or manual methods. Adjust temperature, fan speed, and modes with intuitive buttons for convenient operation of your air conditioner.

Automatic and Manual Setup Methods

Use the automatic setup method for quick pairing or opt for manual setup by entering the device code. Both methods ensure seamless remote control functionality for your Sharp portable air conditioner, allowing you to adjust settings conveniently.

Using the Remote to Adjust Temperature and Fan Speed

Use the remote to effortlessly adjust the temperature by pressing the “+” or “-” buttons. Select from high, medium, or low fan speeds using the dedicated buttons. For enhanced comfort, the remote also allows activation of the Extra High fan speed for optimal airflow and cooling performance.

Special Features Like Extra High Fan Speed

The Sharp portable air conditioner features an Extra High fan speed for increased airflow. This mode boosts cooling efficiency, ensuring faster temperature reduction. Activate it via the remote for enhanced comfort during extreme heat. Note that in Extra High mode, temperature adjustments are temporarily unavailable.

Temperature Control

Set your desired temperature between 16°C to 30°C using the remote or control panel. The unit adjusts cooling or heating modes to maintain comfort. Press + or ─ buttons to change temperature by 1°C increments for precise control.

Setting the Desired Temperature

Press the + or ─ buttons on the remote or control panel to adjust the temperature. The unit will cycle through cooling or heating modes to maintain your set temperature. The temperature range is from 16°C to 30°C, allowing precise control for optimal comfort.

Temperature Range and Adjustments

The Sharp portable air conditioner allows temperature settings between 16°C and 30°C. Use the + or ─ buttons to adjust the set temperature in 1°C increments. The unit will cycle through modes to maintain the desired temperature, ensuring comfort and energy efficiency. Adjustments are quick and precise for optimal performance.

Understanding the Evaporative Water System

The evaporative water system efficiently manages condensed water during cooling. It evaporates water internally, reducing the need for frequent drainage. This feature enhances performance and convenience, ensuring smooth operation without manual intervention. The system operates automatically, optimizing water usage and maintaining humidity levels effectively.

Maintenance and Care

Regular maintenance ensures optimal performance. Clean filters, drain condensed water, and inspect for blockages. Schedule routine checks to maintain efficiency and extend the unit’s lifespan effectively.

Cleaning the Air Filter

Regularly clean the air filter to ensure efficient airflow and performance. Remove the filter, gently vacuum or wash with mild soap, and dry thoroughly before reinstalling. A clean filter improves cooling efficiency, reduces energy consumption, and prevents dust buildup, ensuring better air quality and system longevity. Always follow the manual’s specific cleaning instructions for optimal results.

Draining Condensed Water

Regularly drain condensed water to ensure proper function. The unit collects water during operation, which should be emptied from the collection tank. Proper drainage prevents leaks and maintains efficiency. Always follow the manual’s instructions for draining to avoid damage and ensure optimal performance. Regular checks are essential for smooth operation.

Regular Checks for Optimal Performance

Perform regular inspections to ensure your Sharp portable air conditioner operates efficiently. Check filters for cleanliness, ensure proper venting, and verify that all connections are secure. Regular maintenance prevents operational issues and extends the unit’s lifespan, ensuring consistent cooling and comfort throughout the year. Schedule checks to maintain peak performance.

Troubleshooting Common Issues

Identify and resolve common issues with your Sharp portable air conditioner using the troubleshooting guide. Refer to error codes, solutions, and maintenance tips for optimal performance. Consult the manual or contact support for further unresolved problems.

Diagnosing and Solving Operational Problems

Diagnose operational issues by checking error codes and symptoms. Verify power supply, drainage, and filter conditions. Reset the unit or clean filters if necessary. For unresolved problems, refer to the troubleshooting section or contact Sharp customer support for professional assistance. Regular maintenance ensures optimal performance and prevents recurring issues. Always follow safety guidelines during troubleshooting to avoid further damage or hazards. If unsure, consult the manual or seek expert help to resolve complex problems effectively and safely.

Understanding Error Codes and Solutions

Refer to the error code list in the manual to identify issues. Common codes like E1 (temperature sensor malfunction) or E2 (drainage issue) require specific solutions. Reset the unit, clean filters, or check drainage. For unresolved errors, consult the troubleshooting guide or contact Sharp support for detailed assistance and resolution. Ensure optimal functionality by addressing errors promptly and correctly.

When to Contact Professional Assistance

Consult a professional if issues persist after troubleshooting or if repairs involve internal components, gas lines, or electrical systems. Contact Sharp support for complex technical problems, severe damage, or safety concerns. Ensure your unit operates safely and efficiently by seeking expert help when necessary. Refer to the manual for contact information and support details.

Technical Specifications

The Sharp Portable Air Conditioner features 10,000 BTU cooling capacity, 120V power requirement, 385 m³/h airflow, and dimensions of 32.7 x 18.5 x 14.2 inches, weighing 80 lbs, with Plasmacluster technology for enhanced air quality.

BTU Ratings and Air Flow Capacity

The Sharp Portable Air Conditioner offers 10,000 BTU cooling capacity, suitable for spaces up to 300 square feet. It features an airflow rate of 385 m³/h on high, 355 m³/h on medium, and 325 m³/h on low settings, ensuring efficient cooling and air circulation.

Power Requirements and Energy Efficiency

The Sharp Portable Air Conditioner requires a 115V/60Hz power supply and consumes approximately 940W during operation. With an Energy Efficiency Ratio (EER) of 9.5, it ensures energy-saving performance. Features like a 24-hour timer and energy-saving mode help reduce power usage while maintaining optimal cooling efficiency.

Dimensions and Weight of the Unit

The Sharp Portable Air Conditioner measures 30.7 inches in height, 18.5 inches in width, and 15.6 inches in depth. It weighs approximately 80.5 pounds, making it compact and portable for easy placement in various rooms without compromising space or mobility.

Additional Features and Upgrades

This section highlights advanced features like Plasmacluster Technology for improved air quality, Software Updates for enhanced compatibility, and Optional Accessories to maximize functionality. These upgrades ensure superior performance and user satisfaction.

Plasmacluster Technology for Air Quality

The Sharp portable air conditioner features Plasmacluster Technology, which enhances indoor air quality by neutralizing airborne pollutants, bacteria, and odors. This advanced system releases positive and negative ions, mimicking natural air purification processes, ensuring cleaner and healthier air for your space while maintaining cooling efficiency.

Software Updates and Compatibility

Regularly check for software updates via the Sharp website to ensure optimal performance and compatibility. Updates enhance functionality, improve efficiency, and maintain system compatibility with the latest technologies. Always ensure your unit is running the most current software version for the best operational experience and enhanced features.

Optional Accessories for Enhanced Functionality

Optional accessories like extra hoses, stands, and filters enhance functionality and mobility. These items improve performance and adaptability, ensuring the unit meets your needs for optimal cooling and convenience. Always check compatibility to ensure seamless integration and enhanced unit performance;

jamie lynn jerk off encouragement/instructional

Jamie Lynn’s approach to masturbation encouragement blends guidance with empowerment, fostering a positive dialogue around sexual health and self-exploration․ This section introduces her unique method․

1․1 Overview of the Topic

Jamie Lynn’s jerk-off encouragement/instructional content focuses on empowering individuals to explore their sexuality confidently․ It balances education with entertainment, offering practical advice while normalizing masturbation as a healthy practice․ The topic emphasizes consent, boundaries, and self-care, making it a comprehensive guide for those seeking to enhance their personal intimacy and sexual well-being through guided encouragement and instruction․

1․2 Importance of Masturbation in Sexual Health

Masturbation is a natural and healthy practice that enhances sexual well-being by reducing stress, improving sleep, and boosting self-esteem․ It aids in understanding one’s body, fostering intimacy and sexual satisfaction․ Jamie Lynn emphasizes its role in physical and mental health, promoting masturbation as a tool for self-care and emotional well-being, supported by educational resources and practical advice․

History of Masturbation Encouragement and Instructional Content

The history of masturbation encouragement spans centuries, evolving from taboo to acceptance, with instructional content emerging as a tool for sexual empowerment and education․

2․1 Evolution of Societal Attitudes Toward Masturbation

Societal attitudes toward masturbation have evolved significantly, transitioning from widespread stigma to growing acceptance․ Historically, many cultures viewed it as taboo, often linked to shame․ However, modern perspectives emphasize its role in sexual health and well-being․ Advocacy and education have played a crucial role in reducing stigma and promoting a more open dialogue about masturbation․

2․2 Historical Figures and Their Views on Masturbation

Historical figures have shaped societal views on masturbation, with some advocating acceptance and others condemning it․ Sigmund Freud viewed masturbation as a natural part of sexual development, while Alfred Kinsey’s research challenged taboos․ These influencers helped shift perceptions, contributing to modern advocacy for masturbation as a healthy practice, aligning with Jamie Lynn’s encouragement of self-exploration․

Types of Encouragement and Instructional Content

This section explores various methods of encouragement, including Jerk Off Instructions (JOI), pornography, and the distinction between written and visual instructional content for masturbation․

3․1 Jerk Off Instructions (JOI) as a Form of Encouragement

Jerk Off Instructions (JOI) involve verbal guidance to encourage masturbation, often through explicit commands or role-play․ This form of encouragement is popular in adult content, fostering relaxation and confidence․ It emphasizes consent and boundaries, ensuring a respectful experience․ JOI can enhance self-exploration and intimacy, proving to be a powerful tool for sexual empowerment and personal comfort․

3․2 Role of Pornography in Masturbation Encouragement

Pornography plays a significant role in masturbation encouragement by offering visual and auditory stimulation․ It provides explicit content that guides individuals through scenarios, enhancing their experience․ While it can boost confidence and reduce inhibitions, it’s important to approach it mindfully․ Moderation is key to avoiding unrealistic expectations and ensuring a healthy balance in sexual exploration and self-expression․

3․3 Written vs․ Visual Instructional Content

Written content provides detailed, step-by-step guidance, allowing for personalization and reflection, while visual content offers immediate, immersive experiences․ Both formats cater to different learning preferences, enhancing masturbation encouragement․ Written materials encourage creativity, whereas visuals demonstrate techniques, making them accessible for various needs and preferences in sexual exploration and education․

Health Benefits of Masturbation

Masturbation enhances physical health by reducing stress and improving sleep․ It boosts mental well-being by releasing endorphins, combating depression, and fostering self-awareness, as Jamie Lynn emphasizes․

4․1 Physical Health Benefits

Masturbation promotes physical health by reducing stress, lowering blood pressure, and improving sleep quality․ It can also alleviate menstrual cramps in individuals with uteruses․ Regular sexual activity, including masturbation, supports immune function and overall well-being․ Jamie Lynn highlights these benefits, encouraging individuals to embrace masturbation as a natural, healthy practice for bodily care and relaxation․

4․2 Mental and Emotional Well-Being

Masturbation fosters mental clarity, reduces anxiety, and enhances mood through endorphin release․ It provides a healthy outlet for stress and emotional tension, promoting self-awareness and confidence․ Jamie Lynn emphasizes its role in building emotional resilience and self-acceptance, encouraging individuals to harness masturbation as a tool for mental health and personal growth․

Setting Boundaries in Encouragement and Instruction

Setting boundaries ensures mutual respect and consent․ It’s crucial to establish clear limits and communicate them effectively, fostering a respectful environment for all parties involved․

5․1 Importance of Consent in Instructional Content

Consent is fundamental in instructional content, ensuring mutual respect and clear communication between participants․ It ensures safety, legality, and psychological comfort, fostering trust and confidence․ Without consent, content risks being exploitative or harmful, potentially leading to legal or emotional consequences․ Always prioritize explicit agreement to maintain ethical standards and protect all parties involved․

5․2 Dealing with “Jerk” Clients and Boundaries

Setting clear boundaries with difficult clients is crucial to maintain professionalism and emotional well-being․ Techniques include active listening, firm communication, and knowing when to disengage․ Prioritizing personal boundaries ensures a healthy work environment, fostering respect and reducing stress․ Remember, client behavior is not a reflection of your worth, and it’s okay to terminate interactions if boundaries are crossed․

Psychological Aspects of Masturbation Encouragement

Masturbation encouragement promotes mental well-being by reducing stress and anxiety, improving self-esteem, and fostering self-awareness․ It also helps individuals overcome feelings of guilt and shame associated with sexual exploration․

6․1 The Role of Fantasy in Masturbation

Fantasy plays a crucial role in masturbation by enhancing arousal and personal satisfaction․ It allows individuals to explore diverse scenarios, desires, and emotions safely․ Jamie Lynn emphasizes that fantasies can deepen self-connection and pleasure, making masturbation a more fulfilling experience․ This imaginative aspect is key to her encouragement, promoting mental and sexual well-being through creative expression․

6․2 Overcoming Guilt and Shame Associated with Masturbation

Jamie Lynn addresses the emotional barriers of guilt and shame by promoting self-acceptance and education․ She encourages individuals to embrace masturbation as a natural, healthy act, fostering a positive mindset․ By normalizing the experience, her guidance helps individuals break free from societal stigma, allowing them to explore their sexuality with confidence and emotional freedom․

Cultural and Social Implications

Cultural perceptions of masturbation vary widely, influencing societal norms and personal feelings․ Jamie Lynn’s encouragement aims to challenge these norms and promote a positive, healthy view․

7․1 Masturbation in Different Cultures

Masturbation is viewed differently across cultures, with some embracing it as natural and others condemning it due to religious or societal norms․ In Japan, erotic art often depicts masturbation, while in many Middle Eastern cultures, it remains taboo․ Jamie Lynn’s encouragement challenges these norms, promoting self-acceptance and sexual health globally, regardless of cultural background․

7․2 Societal Stigma and Taboo Surrounding Masturbation

Societal stigma and taboo surrounding masturbation persist due to religious and cultural norms․ Many view it as immoral or shameful, leading to guilt and secrecy․ Jamie Lynn challenges these taboos by promoting open dialogue and self-acceptance․ Her approach encourages individuals to embrace masturbation as a natural part of sexual health, fostering confidence and reducing stigma․

Safety and Hygiene in Masturbation

Practicing proper hygiene and using clean materials are essential for safe masturbation․ Avoiding infections and ensuring personal comfort are key to a healthy experience․

8․1 Best Practices for Safe Masturbation

  • Use clean, body-safe materials to minimize infection risks․
  • Wash hands before and after masturbation to maintain hygiene․
  • Choose lubrication to reduce irritation and enhance comfort․
  • Ensure privacy to create a relaxed environment for self-exploration․
  • Avoid sharing materials or tissues to prevent cross-contamination․
  • Be mindful of personal boundaries and communicate openly with partners․
  • Remember, masturbation is a healthy, natural activity when practiced responsibly․

8․2 Avoiding Infections and Health Risks

To minimize health risks, prioritize hygiene by using clean, body-safe tools and washing hands thoroughly․ Avoid sharing personal items to reduce infection chances․ Lubricants can prevent irritation, while proper aftercare ensures comfort․ Be cautious of unsanitary environments and avoid overexertion․ Remember, safe practices enhance the overall experience and protect long-term well-being․

Modern Trends in Masturbation Encouragement

Modern trends emphasize online communities, virtual reality, and AI-driven tools, enhancing accessibility and personalization․ These innovations foster a more inclusive and tech-savvy approach to self-exploration․

9․1 The Rise of Online Communities and Forums

Online communities have flourished, offering spaces for open discussions about masturbation․ Forums and social platforms provide resources, shared experiences, and encouragement, fostering a sense of connection and reducing stigma․ These spaces often feature content like Jerk Off Instructions (JOI), catering to diverse preferences and promoting healthy exploration․ They also highlight the importance of consent and boundaries, ensuring a respectful environment for all participants․

9․2 Technology’s Role in Enhancing Masturbation Experiences

Technology has revolutionized masturbation through innovative tools like VR, AI, and interactive sex toys․ These advancements provide immersive experiences, enhancing pleasure and personalization․ Apps and platforms now offer guided sessions, while AI tailors content to individual preferences․ Additionally, technology facilitates discreet access to instructional materials, ensuring privacy and convenience․ This integration of tech and intimacy fosters a modern, stigma-free approach to self-exploration․

Legal and Ethical Considerations

Legal and ethical considerations involve understanding laws on explicit content and ensuring consent․ Ethical practices prioritize privacy, respect, and safety in instructional materials and interactions․

10․1 Legal Implications of Sharing Explicit Content

Sharing explicit content, like jerk-off instructions, raises legal concerns․ Laws vary by region, but distributing such material may violate obscenity laws or age-related regulations․ Consent and age verification are critical․ Platforms may face liability for hosting explicit content, and creators must ensure compliance with local laws to avoid legal repercussions․ Legal advice is often necessary to navigate these complexities safely․

10․2 Ethical Concerns in Creating Instructional Content

Creating instructional content, such as jerk-off encouragement, raises ethical questions․ Issues include consent, privacy, and potential exploitation․ Content creators must consider the impact on participants and audiences, ensuring no harm or coercion․ Ethical guidelines should prioritize respect, transparency, and safety to maintain trust and integrity in the material produced․

Jamie Lynn’s approach highlights masturbation’s role in sexual health, emphasizing empowerment and self-exploration․ Her work challenges societal norms, fostering open dialogue and promoting responsible encouragement of personal intimacy practices․

11․1 Summary of Key Points

Jamie Lynn’s instructional content emphasizes consent, boundaries, and self-exploration, aligning with modern trends in masturbation encouragement․ Her approach integrates fantasy and addresses guilt, promoting mental well-being while respecting cultural diversity and safety․ By fostering open dialogue, she challenges societal stigma, encouraging healthy masturbation practices through various media forms, including JOI and visual aids, ensuring accessibility and inclusivity for all individuals․

11․2 Final Thoughts on the Importance of Masturbation Encouragement

Masturbation encouragement, as championed by Jamie Lynn, empowers individuals to embrace their sexuality healthily․ By normalizing self-exploration, it fosters confidence, reduces stigma, and promotes mental well-being․ Open conversations about sexual health are crucial for societal progress, and educators like Jamie Lynn play a vital role in this movement, ensuring that masturbation is viewed as a natural and beneficial aspect of human sexuality․

Additional Resources

Explore Jamie Lynn’s recommended books, websites, and support communities for masturbation encouragement and instructional content, focusing on health and well-being․

12․1 Recommended Reading and Websites

Jamie Lynn recommends books like Creative Block and Your Inner Critic Is A Big Jerk for overcoming creative and personal challenges․ Websites such as online forums and communities provide additional support, offering guidance on masturbation encouragement and instructional content, ensuring a safe and informed approach to sexual health and self-exploration․

12․2 Support Groups and Communities

Jamie Lynn encourages engagement with support groups and communities that promote healthy discussions around masturbation․ Online forums like Reddit and specialized groups offer safe spaces for sharing experiences․ Workshops and virtual meetups further provide resources for those exploring their sexuality․ These communities foster empowerment and understanding, ensuring individuals feel supported in their journey of self-discovery and sexual well-being․

Final Remarks

Emphasizing self-exploration and empowerment, Jamie Lynn’s guidance highlights masturbation’s role in sexual health․ This encouraging approach fosters a positive, open dialogue about personal intimacy and well-being․

13․1 Encouragement for Further Exploration

Exploring masturbation with curiosity and openness can enhance personal growth and intimacy․ Jamie Lynn’s guidance encourages individuals to embrace self-discovery, fostering confidence and a healthier relationship with their bodies․ By prioritizing consent and boundaries, this approach promotes a positive, empowering experience, urging individuals to continue their journey of sexual self-awareness and well-being with confidence and curiosity․

13․2 The Future of Masturbation Encouragement and Instruction

The future of masturbation encouragement lies in technology and inclusivity, with platforms offering personalized experiences․ Virtual reality and AI-driven content will enhance exploration, while educators like Jamie Lynn will continue to normalize and educate․ This evolving landscape promises a more open, accepting, and informed approach to sexual health, fostering a culture of consent and self-awareness for all individuals․

craftsman garage door opener instruction manual

The Craftsman Garage Door Opener is a reliable‚ high-performance solution designed for effortless garage door operation. Known for its durability and user-friendly design‚ it offers advanced features like remote control functionality‚ keyless entry‚ and safety sensors. With energy-efficient motors and whisper-quiet operation‚ it enhances convenience while ensuring security and longevity; Perfect for homeowners seeking a blend of innovation and dependability‚ the Craftsman opener is a top choice for modern garages.

  • Remote control and keyless entry for easy access.
  • Advanced safety sensors to prevent accidents.
  • Energy-efficient and quiet operation.
  • Compatible with smart home technology.

Whether you’re upgrading or installing for the first time‚ the Craftsman Garage Door Opener delivers unmatched quality and convenience‚ ensuring smooth and secure garage door operation.

1.1 Overview of Features and Benefits

The Craftsman Garage Door Opener is equipped with cutting-edge features designed to enhance convenience‚ safety‚ and efficiency. It includes advanced safety sensors‚ remote control functionality‚ and a keyless entry pad for secure access; The opener also boasts a durable belt or chain drive system‚ ensuring smooth and quiet operation. Energy-efficient motors and optional smart technology integration make it a modern choice for homeowners. Additional benefits include long-lasting performance‚ easy maintenance‚ and compatibility with various garage door types. These features combine to provide a reliable and user-friendly experience‚ making it a top choice for home automation needs.

  • Advanced safety sensors for accident prevention.
  • Remote control and keyless entry for convenient access.
  • Durable belt or chain drive for smooth operation.
  • Energy-efficient and whisper-quiet performance.
  • Smart technology compatibility for modern homes.

With its robust design and innovative features‚ the Craftsman Garage Door Opener offers unparalleled convenience and reliability for homeowners.

Safety Precautions and Essential Warnings

Ensure proper installation and balance of the garage door. Avoid entrapment zones. Keep remotes out of children’s reach. Be cautious with electrical components.

  • Ensure proper installation and balance.
  • Avoid entrapment zones.
  • Keep remotes out of children’s reach.
  • Be cautious with electrical components.

Follow all safety guidelines to prevent accidents and ensure safe operation.

2.1 General Safety Guidelines

Always read and follow the owner’s manual before using the garage door opener. Ensure the door is properly installed and balanced. Never stand under a moving door. Keep children and pets away from operating zones. Avoid touching electrical components. Regularly inspect and maintain the opener to prevent malfunctions. Ensure the manual is accessible near the door for quick reference. Follow all safety rules to minimize risks and ensure smooth operation. Be cautious of entrapment zones and never attempt repairs without proper knowledge.

  • Read the manual thoroughly before use.
  • Ensure proper installation and balance.
  • Keep children and pets away.
  • Regularly inspect and maintain the opener.

By following these guidelines‚ you can ensure a safe and reliable garage door operation experience.

2.2 Understanding Safety Sensors and Alarms

Safety sensors and alarms are crucial for preventing accidents and ensuring proper operation. Located near the garage floor‚ these sensors detect obstructions and trigger the door to stop or reverse. If the sensors are misaligned or faulty‚ the opener may not function correctly. Regularly check sensor alignment and connections. Alarms sound if the door reversed due to an obstruction‚ indicating a potential hazard. Properly functioning sensors are essential for safe and reliable operation‚ ensuring the door operates smoothly while protecting people and pets.

  • Sensors detect obstructions and prevent accidents.
  • Ensure sensors are aligned and connected properly.
  • Alarms alert you to potential hazards.
  • Regular checks are vital for safe operation.

By maintaining and understanding safety sensors and alarms‚ you can ensure a secure and efficient garage door system.

Installation and Assembly Instructions

Mount the opener on the ceiling‚ ensuring proper alignment with the door. Attach the chain or belt to the door bracket securely. Tighten all bolts and screws firmly. Connect the rail to the motor and test the door’s balance. Follow the manual for precise measurements and ensure all safety features are activated. Double-check all connections and alignments before first use.

  • Mount the opener on the ceiling carefully.
  • Attach the chain or belt securely.
  • Tighten all bolts and screws properly.
  • Ensure the door is balanced and aligned.

Always follow safety guidelines and ensure all parts are secure before testing the opener.

3.1 Step-by-Step Installation Guide

Start by unboxing and organizing all components. Position the motor unit on the ceiling‚ ensuring it’s centered and aligned with the door. Attach the rail to the motor and extend it to the door bracket. Secure the trolley to the door using the provided hardware. Connect the chain or belt to the trolley and motor‚ ensuring proper tension. Install safety sensors 6 inches above the floor on both sides of the door. Plug in the opener and test the door’s operation. Refer to the manual for precise measurements and adjustments.

  • Position the motor unit on the ceiling.
  • Attach the rail to the motor and extend it.
  • Secure the trolley to the door bracket.
  • Connect the chain or belt to the trolley.
  • Install safety sensors 6 inches above the floor.

Test the door’s operation to ensure smooth functionality and proper alignment. Always follow the manual for specific instructions and safety guidelines.

3.2 Wiring and Electrical Requirements

Ensure the Craftsman garage door opener is connected to a dedicated 120V electrical outlet. Avoid using extension cords‚ as they may cause power issues. Connect the motor unit to the wall outlet‚ ensuring the outlet is grounded for safety. Wire the safety sensors to the black and white terminals on the motor. Secure all connections tightly to prevent loose wires. If installing additional features like keyless entry‚ follow the wiring diagram in the manual. Test the system to ensure proper function and verify circuit breaker settings before use.

  • Use a dedicated 120V electrical outlet.
  • Connect sensors to black and white terminals.
  • Ensure all wiring is secure and grounded.
  • Refer to the manual for specific wiring diagrams.

Consult a licensed electrician if unsure about any wiring step to ensure safety and compliance with local regulations.

Programming Your Garage Door Opener

Programming your Craftsman garage door opener involves syncing the remote and keypad. Press the “Learn” button on the motor unit‚ then the remote button to sync. Ensure the indicator light confirms successful pairing. For keyless entry‚ enter the default PIN and follow the manual’s instructions to set a new code. Test all devices to verify proper operation and adjust settings as needed for seamless functionality.

4.1 Remote Control Programming

Programming the remote control for your Craftsman garage door opener is a straightforward process. Start by locating the “Learn” button on the motor unit‚ typically found near the antenna. Press and release this button to enter programming mode. Next‚ press the desired button on your remote control within 30 seconds. The opener will confirm synchronization with a light blink or click. Test the remote to ensure proper operation. If issues arise‚ repeat the process or consult the manual for troubleshooting tips. This ensures seamless connectivity and reliable performance.

  • Locate and press the “Learn” button on the motor unit.
  • Press the remote button within 30 seconds.
  • Confirm synchronization with a light or sound indicator.
  • Test the remote to ensure functionality.

4.2 Keyless Entry Pad Setup

Setting up the keyless entry pad for your Craftsman garage door opener is simple. First‚ ensure the pad is compatible with your opener model. Press and hold the “Learn” button on the motor unit until the indicator light blinks. Enter a 4-digit PIN on the keypad and press “Enter.” The opener will confirm the setup with a light flash or click. Test the keypad to ensure it operates the door smoothly. If issues arise‚ repeat the process or reset the system. This feature enhances security and convenience for garage access.

  1. Press and hold the “Learn” button until the light blinks.
  2. Enter a 4-digit PIN and press “Enter.”
  3. Test the keypad to confirm functionality.
  4. Reset if necessary and repeat the process.

Maintenance and Care Tips

Regular maintenance ensures optimal performance. Lubricate moving parts annually‚ clean sensors‚ and inspect belts/chains for wear. Tighten hardware and replace worn components promptly to prevent issues.

  • Lubricate rollers and springs yearly.
  • Clean sensors to maintain safety features.
  • Inspect belts or chains for damage.

5.1 Regular Lubrication and Cleaning

Regular lubrication and cleaning are essential for maintaining your Craftsman garage door opener’s performance. Lubricate the chain or belt‚ rollers‚ and springs annually with silicone-based lubricant. Clean the sensors with a soft cloth to ensure proper alignment and function. Wipe down the opener’s exterior to prevent dust buildup. Inspect and tighten loose hardware to maintain stability. Replace worn parts promptly to avoid further damage. Proper maintenance ensures smooth operation‚ reduces wear‚ and extends the opener’s lifespan while preventing unexpected malfunctions.

  • Lubricate chains‚ belts‚ and springs yearly.
  • Clean sensors and ensure proper alignment.
  • Inspect hardware and tighten as needed.

5.2 Belt or Chain Adjustment

Adjusting the belt or chain on your Craftsman garage door opener ensures optimal performance and longevity. Start by locating the adjustment mechanism‚ typically found near the motor or along the rail. Use the provided tools or an Allen wrench to tighten or loosen the bolts controlling tension. Check the manual for specific instructions and diagrams to guide you through the process. Avoid over-tightening‚ as this can lead to premature wear. If unsure‚ consult the manual or seek professional assistance to ensure proper adjustment and safety.

  • Locate the adjustment mechanism near the motor or rail.
  • Use appropriate tools to adjust belt or chain tension.
  • Refer to the manual for detailed instructions and diagrams.

Troubleshooting Common Issues

Identify and resolve common issues with your Craftsman garage door opener by checking sensor alignment‚ remote batteries‚ and chain tension. Consult the manual for detailed solutions.

  • Check sensor alignment for proper function.
  • Ensure remote batteries are charged or replaced.
  • Inspect chain tension and adjust as needed.

6.1 Diagnosing Common Problems

Start by identifying symptoms such as uneven door movement‚ loud noises‚ or failure to respond to remote commands. Check sensor alignment and connections‚ as misalignment or faulty sensors can disrupt operation. Verify remote batteries and ensure the opener is properly plugged in. Inspect the chain or belt for tension and wear. If the door opens randomly‚ suspect a faulty logic board or interference from nearby devices. Consult the manual for specific error codes and troubleshooting steps to pinpoint the issue effectively.

  • Check sensor alignment and connections.
  • Inspect chain or belt for wear and tension.
  • Verify remote functionality and battery status.
  • Review manual for error codes and solutions.

6.2 Resetting the Garage Door Opener

To reset your Craftsman garage door opener‚ locate the small reset button near the power plug or on the motor unit. Press and hold this button for 5-10 seconds until the lights blink‚ indicating a factory reset. Release the button and wait for the system to reboot. After resetting‚ reprogram your remote controls and keyless entry pad following the manual instructions. This process resolves issues like erratic behavior or failed programming attempts‚ restoring proper functionality to your garage door opener.

  • Locate the reset button near the power plug or motor.
  • Press and hold the button for 5-10 seconds.
  • Wait for the system to reboot and lights to blink.
  • Reprogram remotes and keyless entry after resetting.

Understanding Opener Features

The Craftsman Garage Door Opener features advanced technology for smooth operation. It includes remote control access‚ keyless entry‚ and safety sensors to ensure secure and convenient use.

  • Remote control for easy operation from a distance.
  • Keyless entry pad for added security and convenience.
  • Safety sensors to detect obstacles and prevent accidents.
  • Compatibility with smart home systems for enhanced control.

These features provide a seamless and secure garage door operation experience‚ tailored to modern homeowner needs and preferences.

7.1 Advanced Features and Technology

The Craftsman Garage Door Opener boasts cutting-edge features like MyQ smart technology‚ enabling smartphone app control and real-time notifications. It also includes advanced safety sensors‚ a keyless entry pad‚ and a powerful‚ quiet motor. The opener supports battery backup systems‚ ensuring operation during power outages. Additionally‚ it is compatible with a wide range of garage door types and sizes‚ making it versatile for various installations. These features enhance convenience‚ security‚ and reliability‚ providing a modern solution for garage door automation.

  • Smartphone app control via MyQ technology.
  • Battery backup for power outage functionality.
  • Advanced safety sensors for obstacle detection.
  • Compatibility with various garage door sizes.

These advanced features make the Craftsman Garage Door Opener a top choice for homeowners seeking innovation and reliability in garage door operation.

Warranty Information and Support

Craftsman garage door openers come with a comprehensive warranty covering parts and labor. For support‚ contact customer service or refer to the manual for detailed assistance.

8.1 Warranty Coverage and Claims

The Craftsman garage door opener warranty typically covers parts and labor for a specified period‚ ensuring protection against manufacturing defects. To file a claim‚ review the manual for eligibility criteria and required documentation. Contact customer support for assistance with the claims process. Proper installation and maintenance are essential to maintain warranty validity. Keep records of purchases and maintenance for smooth claims handling.

  • Covers parts and labor against defects.
  • Varies by model and purchase date.
  • Requires proof of purchase and installation.

Ensure all claims are submitted within the warranty period for prompt resolution.

8.2 Contacting Customer Support

For assistance with your Craftsman garage door opener‚ contact customer support through phone‚ email‚ or live chat. Visit the official website for contact details and support options. Have your model number and purchase details ready to expedite the process. Support representatives are available to address installation‚ troubleshooting‚ and warranty-related inquiries. Ensure to provide clear descriptions of issues for prompt resolution.

  • Phone support for direct assistance.
  • Email for detailed inquiries and documentation.
  • Live chat for quick answers and guidance.

Customer support is committed to resolving issues efficiently‚ ensuring your garage door opener functions optimally.

The Craftsman garage door opener is a reliable and innovative solution for modern homeowners. By following the manual’s guidelines‚ you can ensure smooth operation‚ safety‚ and longevity. Regular maintenance and proper troubleshooting will keep your opener functioning optimally. For any unresolved issues‚ reaching out to customer support guarantees professional assistance. With its advanced features and durable design‚ the Craftsman garage door opener remains a trusted choice for secure and convenient garage door management.

tony’s pizza instructions

Crafting Tony’s Pizza involves mastering essential ingredients, precise techniques, and a passion for flavor. From activating yeast to layering toppings, this guide ensures perfect crust and authentic taste, blending tradition with modern twists for home bakers and pizza enthusiasts alike.

Understanding the Ingredients

Quality ingredients are key to Tony’s Pizza. Essential components include high-protein flour, active yeast, warm water, salt, and sugar for dough, while cheeses like mozzarella and toppings add flavor.

Essential Ingredients for Tony’s Pizza Dough

The foundation of Tony’s Pizza begins with simple yet high-quality ingredients. High-protein flour, such as bread flour, ensures a chewy, well-structured crust. Active dry yeast is crucial for fermentation, providing the dough’s rise. Warm water (around 90-100°F) hydrates the flour and activates the yeast. A pinch of salt enhances flavor and controls yeast activity, while a touch of sugar feeds the yeast for a consistent rise. Some recipes include olive oil for dough tenderness and a hint of honey for crust color. Using fresh yeast and precise measurements ensures reliability. These ingredients, combined in the right proportions, create a balanced, flavorful dough that bakes into a crispy yet airy crust, perfect for Tony’s signature pizzas.

Top Toppings and Cheeses for Authentic Flavor

For an authentic Tony’s Pizza, the toppings and cheeses are carefully selected to deliver bold, balanced flavors. A blend of white cheddar, brick cheese, and whole-milk mozzarella creates a creamy, melty base, while fresh herbs like basil add brightness. Pepperoni, sausage, and salami provide a savory, meaty depth. Mushrooms, peppers, and onions bring earthy notes, while olives add a briny touch. For a Detroit-style twist, layers of cheese and toppings are baked into a crispy, caramelized crust. Fresh herbs and high-quality ingredients ensure a vibrant, authentic taste. Tony’s commitment to using the finest cheeses and toppings guarantees a pizza that’s both hearty and flavorful, perfect for satisfying any craving.

Dough Preparation

Preparing Tony’s Pizza dough involves essential ingredients like yeast, flour, water, sugar, and salt. Mixing and kneading techniques ensure a smooth, elastic texture for the perfect base.

Activating the Yeast for the Perfect Rise

Activating yeast is the first step in making Tony’s Pizza dough. Combine 1 package (2 1/4 teaspoons) of active dry yeast with 1 cup of warm water (90°F to 100°F) and 1 tablespoon of sugar. Stir gently and let it sit for 5-10 minutes until it becomes frothy and bubbly, indicating the yeast is active and ready to use. This process ensures the dough will rise properly, creating a light and airy texture. Proper activation is crucial for achieving the perfect crust.

Mixing and Kneading Techniques

After activating the yeast, combine the mixture with 2 cups of flour, 1 tablespoon of salt, and 2 tablespoons of olive oil. Gradually add 1 cup of ice-cold water while mixing until a dough forms. Use a stand mixer with a dough hook or knead by hand for 10 minutes, ensuring the dough becomes smooth and elastic. Proper kneading develops gluten, essential for a chewy crust. Avoid overworking the dough to maintain its tender texture. Once kneaded, the dough is ready for proofing, a critical step in achieving the perfect rise and flavor in Tony’s Pizza.

Proofing the Dough for Optimal Texture

Once mixed and kneaded, the dough requires proofing to achieve the ideal texture. Place the dough in a lightly oiled bowl, cover it with plastic wrap or a damp cloth, and let it rest in a warm, draft-free area. Allow the dough to rise for 1 hour, or until it has doubled in size. This step allows the yeast to ferment, developing the dough’s flavor and structure. Avoid overproofing, as it can lead to a dense crust. Once proofed, gently punch down the dough to release air bubbles, ensuring an even texture. This process prepares the dough for shaping and topping, crucial for achieving Tony’s signature pizza crust.

Shaping the Dough

Shaping Tony’s Pizza dough involves hand-stretching or using a rolling pin to achieve the desired form. Each method offers unique benefits, ensuring the perfect crust texture.

Hand-Stretching vs. Rolling Pin Methods

Hand-stretching Tony’s Pizza dough creates a crispy crust with a soft center, preserving air pockets for texture. This technique requires gently pulling and rotating the dough, enhancing its natural elasticity. A rolling pin ensures uniform thickness and a flat surface, ideal for even baking. Hand-stretching suits traditional styles, while rolling pins are better for precise shapes. Both methods demand flour to prevent sticking. Proper handling ensures the dough retains its quality. Using the right technique based on desired texture ensures a perfectly baked crust every time, whether aiming for a classic or modern pizza style.

Toppings and Assembly

Layering sauces, cheeses, meats, and vegetables creates a balanced, flavorful pizza. Start with a thin sauce base, add a mix of cheeses, then top with fresh ingredients for a delicious finish.

Layering Sauces, Cheeses, and Toppings

Start by spreading a thin layer of tomato sauce over the dough, leaving a small border around the edges. Next, sprinkle a blend of mozzarella, Parmesan, and other cheeses evenly for melty, creamy texture. Add toppings like pepperoni, mushrooms, or vegetables, ensuring balanced distribution without overcrowding. Finish with fresh herbs or a drizzle of olive oil for extra flavor. Proper layering ensures each bite is flavorful and cohesive, avoiding sogginess. This method allows the crust to stay crisp while the toppings cook evenly, creating a delicious, well-rounded pizza.

Classic Combinations for Tony’s Pizza

Classic Tony’s Pizza combinations emphasize simplicity and bold flavors. A timeless favorite is the Detroit-style pizza, featuring white cheddar, brick cheese, and whole-milk mozzarella for a creamy, cheesy base. Toppings like pepperoni, sausage, and mushrooms add savory depth. Another popular option is the farmer-style pizza, highlighting fresh tomatoes, mozzarella, and basil for a lighter, herby taste. For meat lovers, combinations such as salami, ham, and olives provide a hearty, umami-rich experience. These classic pairings ensure a balanced blend of flavors and textures, making every bite satisfying and authentic to Tony’s tradition of quality and taste.

Baking the Pizza

Preheat your oven to 500°F (260°C) with a baking stone inside for a crispy crust. Bake Tony’s Pizza for 10-12 minutes until golden and bubbly, ensuring a perfect finish.

Preheating the Oven for the Best Crust

Preheating your oven to the correct temperature is crucial for achieving a crispy, well-cooked crust. Set your oven to 500°F (260°C) and let it preheat for at least 30 minutes to ensure even heat distribution. Using a baking stone or steel inside the oven can enhance crust crispiness by absorbing moisture. Place the stone in the oven during preheating to maximize its effectiveness. A properly preheated oven ensures the dough cooks quickly, preventing sogginess and promoting a golden-brown finish. For Tony’s Pizza, this step is essential to replicate the authentic texture and flavor of a professional pizzeria at home;

Assembling and Baking Tony’s Pizza

Assembling Tony’s Pizza requires precision to ensure each bite is flavorful and textured. Start by spreading a thin layer of sauce over the dough, leaving a small border around the edges. Next, add cheese such as mozzarella, white cheddar, and brick cheese for a creamy base. Toppings like pepperoni, sausage, or vegetables should be added in moderation to avoid overwhelming the pizza. Once assembled, place the pizza on a preheated baking stone or steel in an oven set to 500°F (260°C). Bake for 10-12 minutes until the crust is golden and the cheese is bubbly. Rotate the pizza halfway through baking for even cooking. Remove when the edges are crispy and serve hot for the best experience.

Advanced Techniques

Elevate your pizza game with Detroit-Style for a crispy crust and cheesy edges, or use a Poolish for a more complex, flavorful dough, enhancing your culinary expertise.

Mastering the Detroit-Style Pizza Recipe

Detroit-Style pizza is known for its thick, crispy crust and cheesy edges. Start with an 18-ounce dough ball, then spread it evenly in a well-oiled pan; Layer white cheddar, brick cheese, and mozzarella for a rich, creamy base. Add toppings like pepperoni or sausage, ensuring they’re evenly distributed. Bake at 425°F for 20-25 minutes until the crust is golden and the cheese is bubbly; The key is achieving a caramelized crust edge, a hallmark of this style. Let it cool slightly before slicing. This method creates a hearty, flavorful pizza that’s perfect for those who love a crunchy texture and abundant cheese.

Using a Poolish for Better Dough Flavor

A poolish is a natural starter that enhances dough flavor and texture. Mix 0.12 grams of yeast with warm water and flour, letting it ferment for 18-24 hours. This preferment adds depth and complexity to Tony’s pizza dough, creating a lighter, airier texture. It’s ideal for long-fermentation recipes, boosting the crust’s aroma and chew. Incorporate the poolish into the dough for a more refined taste. This technique is popular among pizza enthusiasts for its ability to elevate flavor profiles, making it a must-try for serious bakers aiming for authentic, artisanal results. Let it rest to maximize its benefits before combining with other ingredients for the perfect rise.

Expert Tips and Tricks

Optimize your oven by preheating to 550°F for a crispy crust. Use a pizza peel for easy transfers and rotate midway for even cooking. Handle dough gently to retain air pockets for a lighter texture. Monitor baking time closely to achieve the perfect golden-brown finish. These expert techniques ensure a professional-quality pizza every time, enhancing both flavor and presentation. Mastering these tips will elevate your pizza-making skills to new heights, guaranteeing delicious results consistently. Elevate your game with precision and practice for the ultimate Tony’s Pizza experience. Perfect for home bakers aiming for authentic, restaurant-quality pizzas. Essential for achieving that perfect crust and flavor balance. Always use fresh, high-quality ingredients for the best taste. Experiment with different cheeses and toppings to find your signature style. Keep dough at room temperature for easier shaping. Don’t overload with toppings to maintain structural integrity. Let the dough rest after shaping to relax the gluten. Invest in a pizza stone for enhanced crust crispiness. For a Detroit-style pizza, bake in a well-oiled pan for a caramelized crust. Use a thermometer to ensure accurate oven temperature. Brush crust edges with olive oil for a golden finish. Sprinkle a pinch of salt on the dough before baking for added flavor. Avoid overworking the dough to prevent toughness. Use a pizza wheel for clean, precise cuts. Store leftover pizza in an airtight container to preserve freshness. Reheat slices in the oven for the best texture. These expert tips will help you achieve a truly exceptional Tony’s Pizza. Always remember, practice makes perfect—experiment and refine your techniques over time. Happy baking!

Optimizing Your Home Oven for Pizza

To achieve a professional-quality pizza at home, proper oven optimization is crucial. Preheat your oven to its highest temperature (usually 550°F) for at least 30 minutes to ensure even heat distribution. Place a pizza stone or steel in the lower rack to absorb moisture and enhance crust crispiness. Use a pizza peel or a lightly floured sheet pan to transfer the dough smoothly. For an extra crispy crust, bake the pizza toward the bottom of the oven. Avoid opening the oven door too early, as this can disrupt the cooking process. Invest in an oven thermometer to maintain accurate temperatures, and rotate the pizza halfway through baking for even cooking. These tips will help you replicate the results of a professional brick oven at home, ensuring a perfectly cooked crust every time.